Skip to content
Arlou BeloriaInvite me
Back to workshops

Workshop guide

Build Your Own Context: A Personal MCP Server with S3, Lambda, API Gateway and Cognito

Own your AI context. Switch models without starting over.

DeliveredAWS Community Day Davao 2026
September 26, 202610 chapters · Live guide + reference
On this page

How to use this guide

Have the listed software and accounts ready. During the workshop, follow the discussion, run preflight at the starting checkpoint, then complete each hands-on step. Open reference panels when you need more detail or help.

DISCUSSIONUnderstand the ideaHANDS-ONDo it and check the result

Before you begin

BEFORE

Have your software, AWS account, AI client, and Obsidian ready. We run preflight together before building.

PREPARE

Prepare before the workshop

  1. 01Install Git, AWS CLI, Terraform 1.10+, and Node.js 22+.
  2. 02Prepare your personal AWS account and a named CLI profile with IAM, S3, Lambda, API Gateway, Cognito, and CloudWatch Logs access.
  3. 03Keep the released template URL handy. We clone it and run preflight together at the start of the hands-on work.
  4. 04Sign in to Claude on the web or ChatGPT and confirm you can add a custom MCP connection. Install Obsidian and confirm you can enable Community plugins.
Use safe sample data

Use one small, non-sensitive note. Do not use passwords, API keys, customer data, or private company material.
OPTIONAL REFERENCEJoining late or stuck preparing?
REFERENCE

If you are joining live or catching up

  1. 01Understand why portable context matters and how the three layers work.
  2. 02Learn how MCP lets a model discover and choose a tool.
  3. 03Clone the template and run the preflight check before building.
  4. 04Use one cross-platform runner to configure the stack, protect Terraform state in S3, deploy, and smoke-test it.
  5. 05Connect one AI client through Cognito.
  6. 06Capture one note and retrieve it with the four-prompt proof.
  7. 07Sync the same Markdown to Obsidian and verify both directions.
Joining late or not prepared yet?

Open Clone the template and run preflight. Fix the first FAIL and rerun. If the group has already reached deployment, follow the demo and finish your own stack afterward. Never borrow another attendee's state bucket.

Take-home material

Tool-selection internals, second-client proof, all-tool prompts, and recovery notes stay in the reference panels. Obsidian sync is part of the live path.

Why own your context

LIVE

Keep your working memory independent of any one AI provider.

DISCUSSION

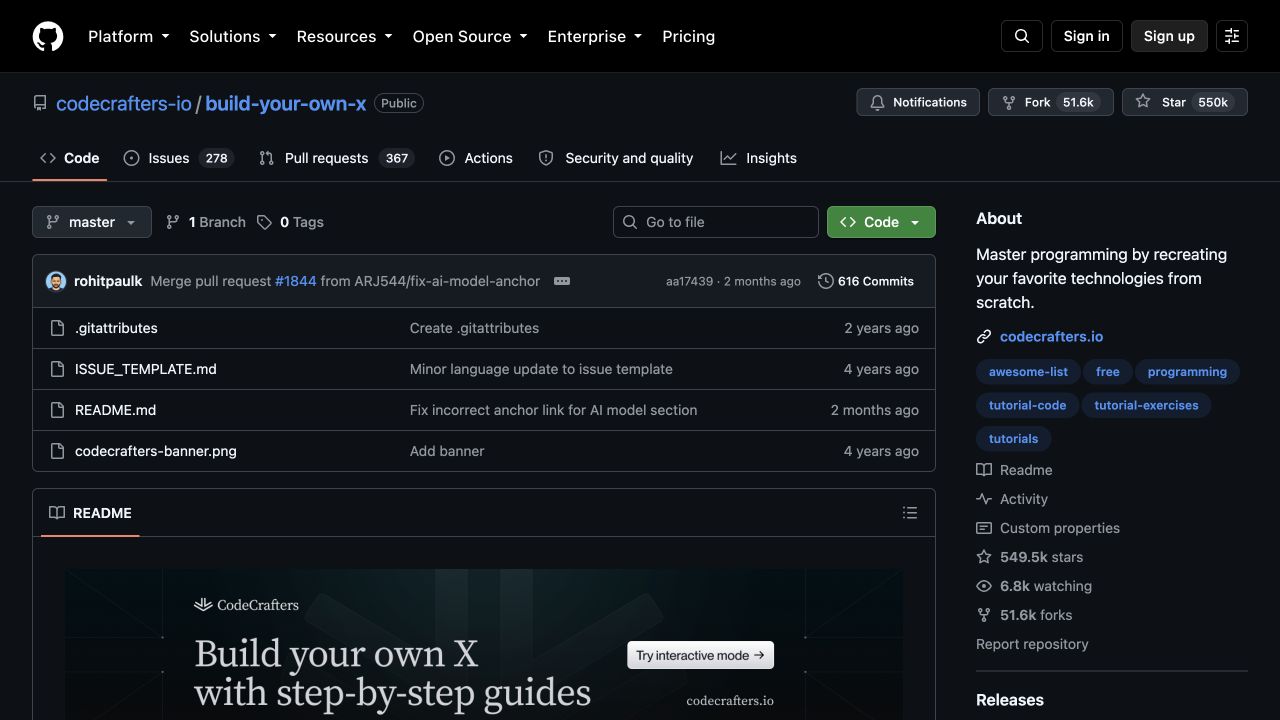
Did you know? A Markdown file can carry a world

Build Your Own X is one of GitHub's most-starred repositories. Its value centers on one curated Markdown file, not an application codebase.

The Build Your Own X GitHub repository showing its star count, short file list, and the Markdown file that carries the main guide.
Build Your Own X on GitHub, captured September 2026
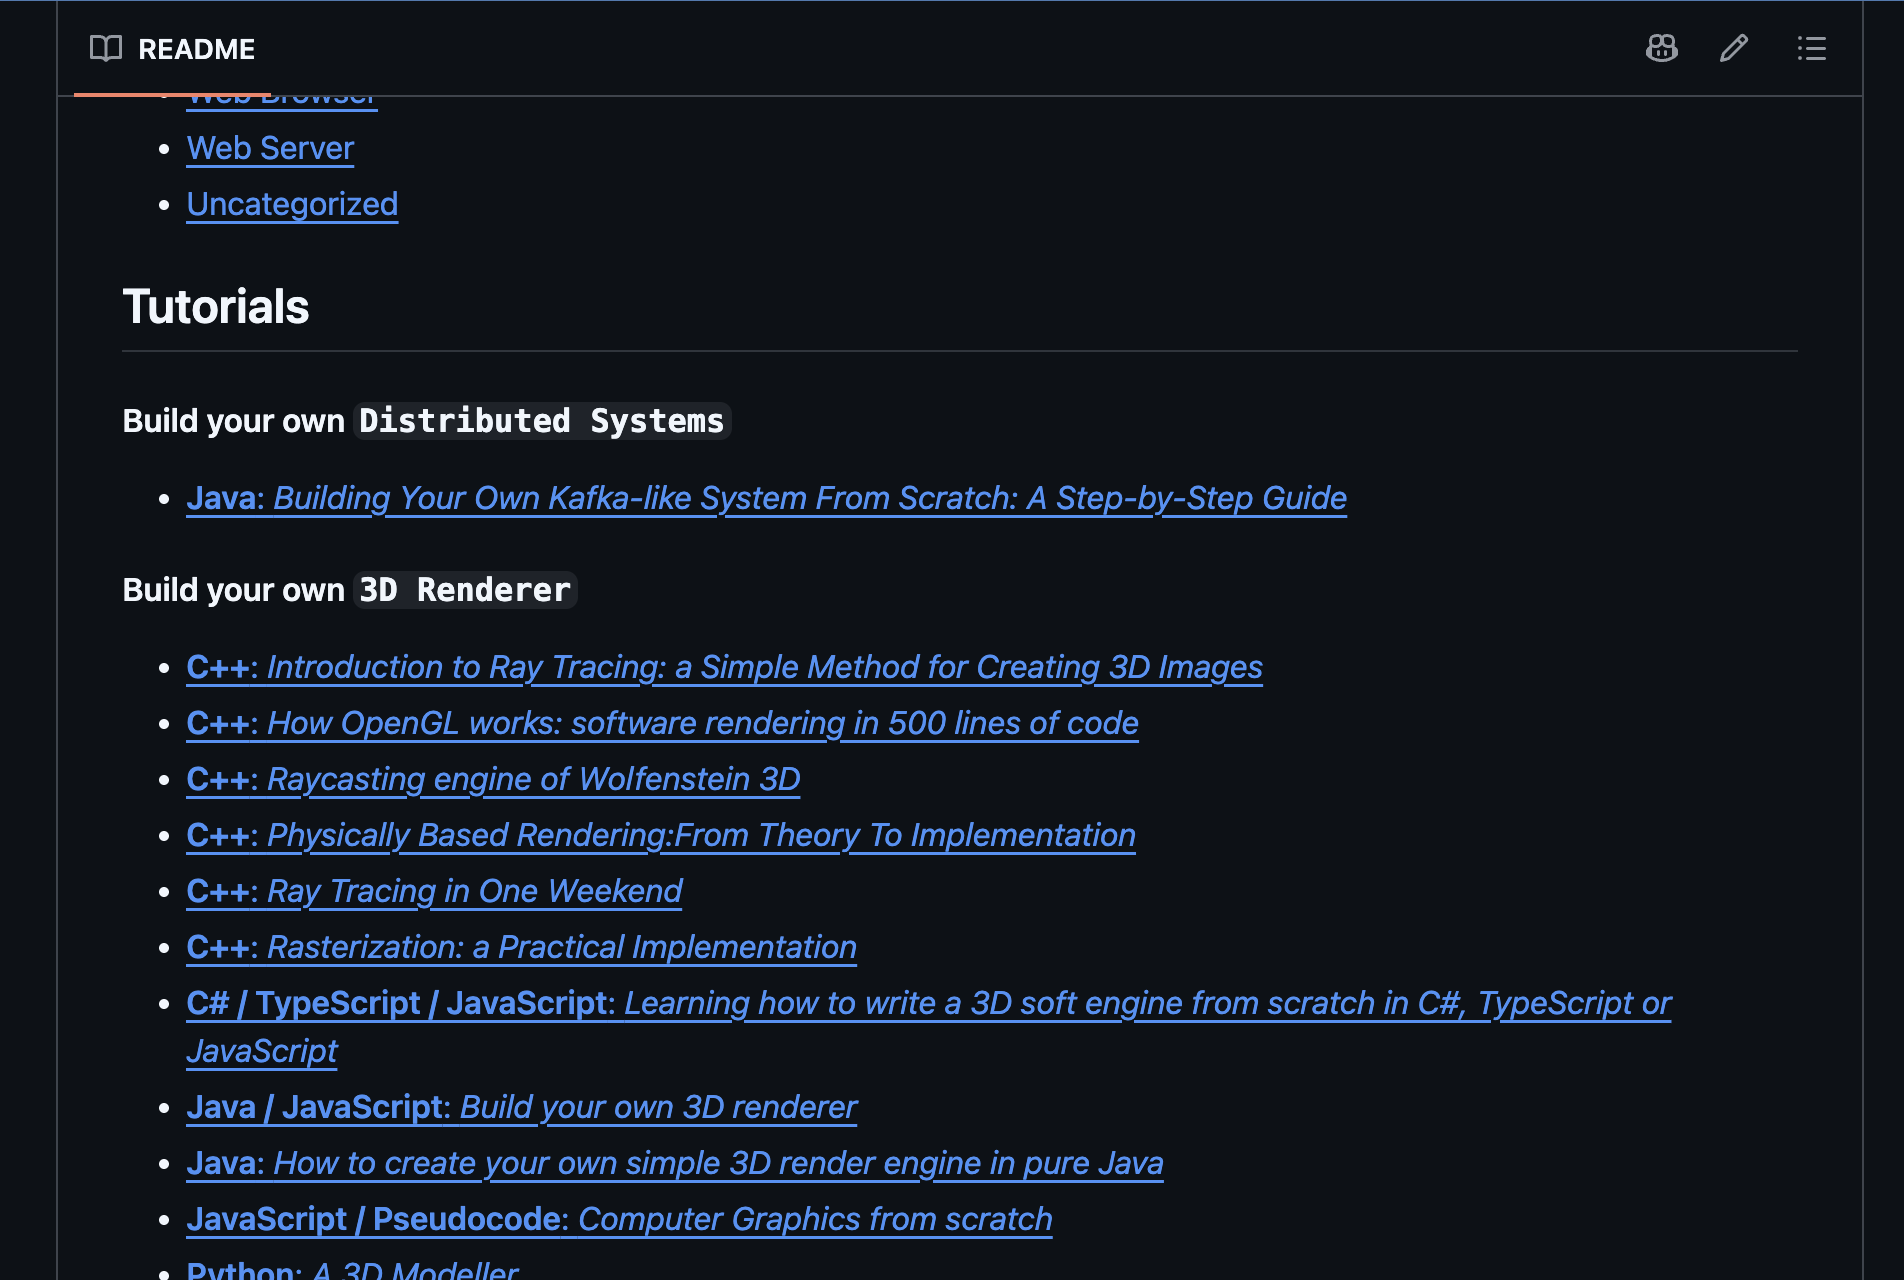
Real Build Your Own X README showing tutorials for Distributed Systems and 3D Renderer, with links to practical guides.
Inside README.md: practical guides organized as Markdown links
The Vault Brain lesson

Vault Brain follows the same idea: its core context is a collection of Markdown files, not complex business logic. The MCP server gives AI controlled access to them.

DISCUSSION

The hidden lock-in inside AI

We teach AI assistants our projects, preferences, constraints, and past decisions. When all of that stays inside one provider, switching means teaching the next assistant again. That repeated work is the context tax.

I felt this when I moved from Claude to OpenAI. The switch was easy because my core context lived in Markdown, not in one chat product. I connected the new client to the same vault and continued from the same notes and rules.

The core thesis

Your AI should be replaceable. Your memory should not.

DISCUSSION

Three layers, three jobs

Keep your durable context at the center. Let the tools and clients around it change.

Vault Brain system schematicContext stays · clients change
  1. AI clients

    Claude web, ChatGPT, and future MCP clients

  2. Tools and access

    Vault Brain MCP and Cognito

  3. Core context

    Readable Markdown in private Amazon S3

Obsidian syncs directly with the same S3 Markdown.

Terraform state stays in a separate private bucket, away from your Markdown vault.

OPTIONAL REFERENCEMore benefits
REFERENCE

What you gain

Switch
Change AI providers without rebuilding your working context.
Inspect
Open the Markdown yourself and see what the AI can read.
Continue
Reach the same vault from another client or device.
Recover
Use S3 version history when a note changes by mistake.
Extend
Add Calendar, Gmail, GitHub, and future connections.
Own
Keep the durable source of truth under your control.

How MCP works

LIVE

You ask in plain language. The client discovers a tool and the server does the work.

DISCUSSION

MCP in plain English

MCP is a standard way for AI applications to discover and use external tools. Think of the server as a librarian: the vault holds the books, and the AI asks the librarian to find, read, or file something.

One request · four controlled steps

You ask

Find my AWS project notes

A natural-language request

AI client

Understands the intent

Selects the vault search capability

MCP server

Checks and executes

Authenticates the request and searches

S3 vault

Returns your context

Matching Markdown reaches the conversation

You speak naturally. The protocol carries a structured request underneath.
DISCUSSION

You ask naturally. The AI chooses the tool.

  1. 01The client requests tools/list. The server returns each tool's name, description, and input schema.
  2. 02The client supplies those tool definitions alongside your message. They are structured model input, not necessarily text pasted onto your prompt.
  3. 03The model selects a tool and its arguments. The client sends them with tools/call.
  4. 04The server returns the result. The client adds it to the conversation so the model can answer.
Do I need to say the tool name?

No. Ask “Find blue mango 42” and the model can choose search_vault. Tool names in this guide help us verify the connection.

DISCUSSION

The server exposes 12 focused tools

6 read
Describe, list, read, search, and inspect links.
4 write
Capture, create, edit, and move notes.
2 remove
Trash is recoverable. Delete is permanent inside the vault.
DISCUSSION

Explore the server architecture

The deployed server is deliberately small: one API Gateway HTTP API forwards every route to one Node.js Lambda.

MCP server architectureOne endpoint · one Lambda · controlled access

AI clients

ChatGPT, Claude Code, Codex, or another MCP host sends HTTPS requests.

Amazon API Gateway

Public HTTPS front door

POST /mcp
Protected MCP JSON-RPC
GET /.well-known/*
Public OAuth discovery
POST /register
Public registration bridge

AWS Lambda · Node.js 22

One runtime, four focused modules

  1. index.ts01
    Entry and MCP router

    Separates public setup routes, then handles initialize, tools/list, and tools/call.

  2. auth.ts02
    Access gate

    Accepts a valid Cognito access token or the configured fallback bearer token.

  3. dcr.ts03
    Registration bridge

    Adds allowlisted client callback URLs to the one public Cognito app client.

  4. tools.ts04
    Tool registry and handlers

    Advertises 12 contracts and performs the selected S3-backed operation.

Amazon Cognito

Owner sign-in, authorization code with PKCE, and access tokens.

Amazon S3

Private, versioned Markdown vault and the durable source of truth.

IAM and CloudWatch

A scoped Lambda role controls AWS access while runtime logs stay observable.

API Gateway forwards every route to the same Lambda. The handler keeps OAuth setup public and requires a bearer token before any MCP tool can run.
Where the security boundary lives

OAuth discovery and /register stay public so a client can learn how to sign in. POST /mcp requires a bearer token. After authorization, the selected handler reaches S3 through the Lambda's scoped IAM role.

Terraform creates API Gateway, Lambda, Cognito, the private versioned Markdown vault, IAM permissions, and CloudWatch logging. A separate protected S3 backend stores Terraform state, and the Lambda cannot read it. There is no vector database or separate authentication service in this template.

Start the hands-on work

LIVE

Clone the template, check this computer and AWS account, then explore the code you will deploy.

HANDS-ON

Clone the template and run preflight

GoalClone the released template and check that this computer can use your AWS account.

Stop if a command fails or the AWS account ID is not yours.

Open the Vault Brain template on GitHub and keep it beside this guide while you work.

One runner on every supported OS

Use the same Node.js runner in Windows PowerShell, Windows Command Prompt, macOS Terminal, or a Linux shell. If PowerShell blocks npm.ps1, use the npm.cmd fallback in the troubleshooting section below.

1 · clone the template
git clone https://github.com/Arlovzki/vault-brain.git
cd vault-brain
2 · prepare and check this computer
npm run preflight -- --fix --profile YOUR_AWS_PROFILE --client claude-web# The first -- passes options to preflight. Replace YOUR_AWS_PROFILE, and use chatgpt instead of claude-web if that is your live client
Ready to continue when

The runner reports READY, Git and AWS CLI pass, Node reports v22 or newer, Terraform reports v1.10 or newer, and you have personally confirmed every CHECK item. In particular, verify that the displayed 12-digit AWS account ID is yours and that your chosen AI client is available. Dependency installation and provider-only Terraform initialization create no AWS resources.

DISCUSSIONCODE WALKTHROUGH

How the codebase is organized

Read the repository in this order. Each folder has one clear job.

repository map
vault-brain/
├── vault-starter/ # Markdown, folders, and vault rules
├── mcp-server/
│ └── src/
│ ├── index.ts # MCP request routing
│ ├── tools.ts # 12 tool contracts and S3 handlers
│ ├── auth.ts # Cognito and bearer verification
│ ├── dcr.ts # OAuth client registration bridge
│ └── day.ts # Vault-local calendar dates
├── state-bootstrap/ # Protected Terraform state bucket
├── terraform/ # Vault Brain AWS infrastructure and S3 backend
├── package.json # Cross-platform workshop commands
└── scripts/
└── workshop.mjs # Configure, preflight, state, deploy, password, and smoke
  1. 01Start with vault-starter/System/schema.md. This is the readable context that teaches an AI how your vault is organized.
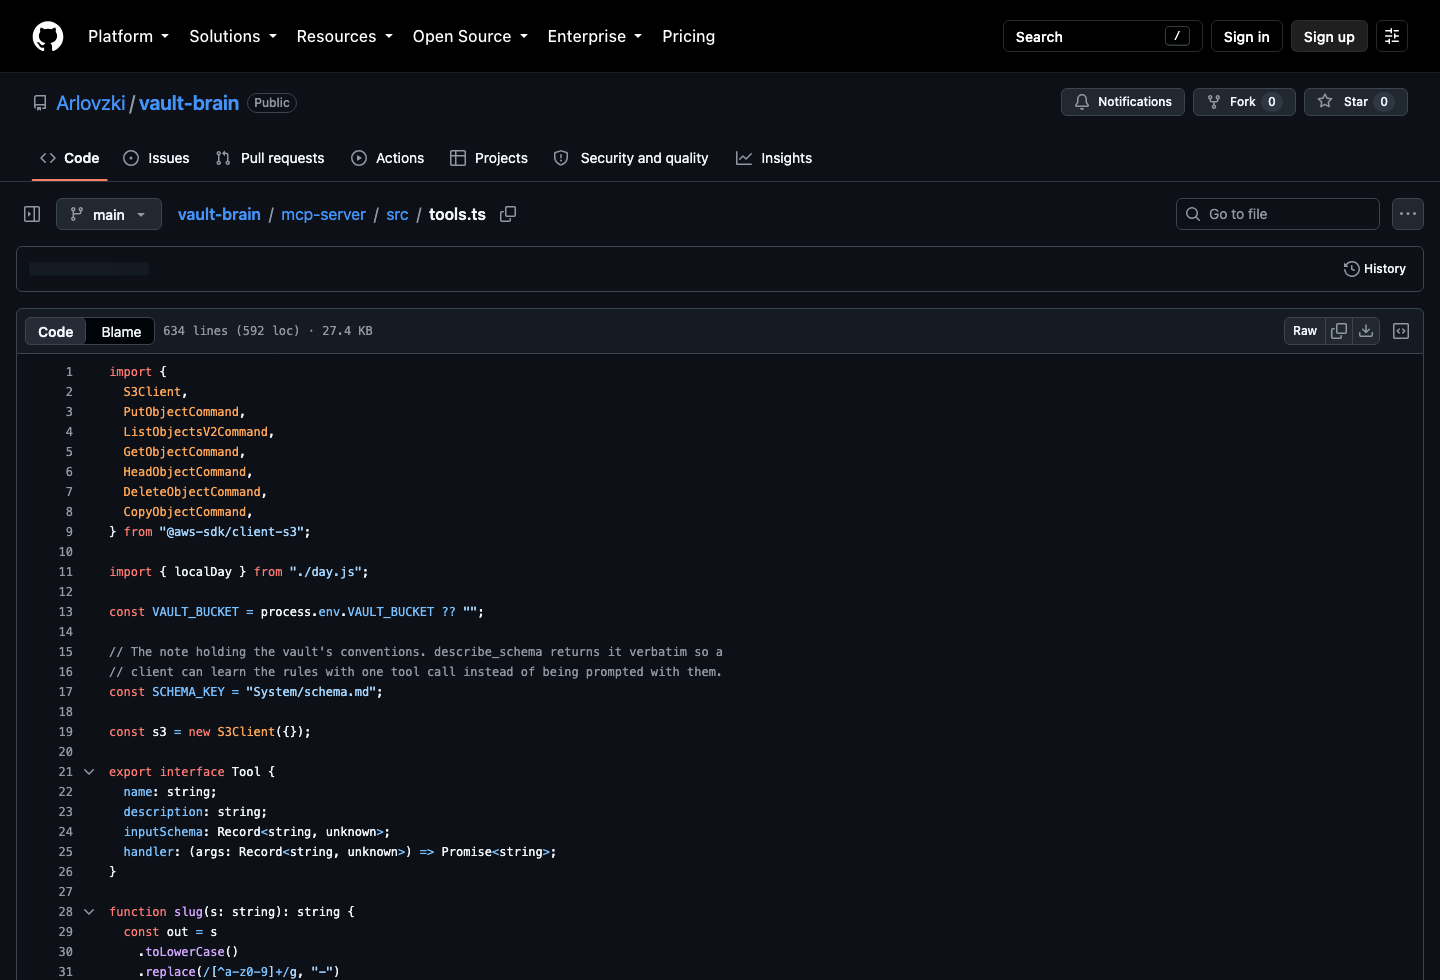
  2. 02Open mcp-server/src/tools.ts. Each tool has a name, description, input schema, and an S3-backed handler.
  3. 03Open index.ts, auth.ts, and dcr.ts. Together they receive MCP requests, verify access, and support OAuth registration.
  4. 04Open state-bootstrap/ and terraform/backend.tf. The first creates the separate protected state bucket; the second declares the main S3 backend without hardcoding account values or credentials.
  5. 05Scan the rest of terraform/. It creates the private versioned Markdown vault, Lambda, HTTP API, Cognito, IAM permissions, and outputs.
  6. 06Finish with the root package.json and scripts/workshop.mjs. They expose the same guided commands on Windows, macOS, and Linux, including safe state migration and conflict checks.
The vault-brain mcp-server src tools.ts file on GitHub showing the S3 imports, schema path, and Tool interface.
The real tools.ts source shows its S3 imports, schema path, and Tool interface.
Follow one request

Your prompt reaches /mcp. index.ts verifies access and dispatches the selected tool. tools.ts reads or writes Markdown in S3, then returns a result to the conversation.

Inspect the current source in mcp-server/src and the deployment resources in terraform.

OPTIONAL REFERENCESetup help and deeper tool code
REFERENCE

If the starting check stops here

Folder already exists

Use the existing clone if it is yours, or choose another parent directory. Do not delete an unfamiliar folder just to rerun git clone.

Node is too old

An EBADENGINE warning usually means Node is older than 22. Upgrade Node, reopen the terminal, and rerun the same preflight command.

Downloads fail

Check internet, proxy, DNS, and certificate access to npm and the Terraform Registry, then rerun the failed command.

AWS profile fails

Configure the named profile first. For an SSO profile, replace the token in aws sso login --profile YOUR_AWS_PROFILE, then check the account again.

PowerShell says scripts are disabled

PowerShell may block npm.ps1 before the workshop runner starts. Use npm.cmd instead. You do not need to change your execution policy. Replace the profile name, and use chatgpt instead of claude-web if that is your live client.

Windows PowerShell fallback
npm.cmd run preflight -- --fix --profile YOUR_AWS_PROFILE --client claude-web

For later workshop steps in that PowerShell window, use npm.cmd run in place of npm run as well.

REFERENCECODE WALKTHROUGH

How the AI identifies the right tool

There is no hidden keyword router. The server publishes tool contracts; the AI client and model decide which contract best matches your request.

mcp-server/src/tools.ts · the four parts of every tool
export interface Tool {
name: string;
description: string;
inputSchema: Record<string, unknown>;
handler: (
args: Record<string, unknown>,
) => Promise<string>;
}
The model can see

name, description, and inputSchema. Together they explain what the tool does and which arguments it accepts.

The model cannot see

The handler, AWS credentials, and S3 implementation stay inside Lambda. The model never reads that source code.

mcp-server/src/index.ts · what tools/list returns
case "tools/list":
return ok(req.id, {
tools: allTools.map((t) => ({
name: t.name,
description: t.description,
inputSchema: t.inputSchema,
})),
});
  1. 01The client connects and calls tools/list.
  2. 02index.ts returns the model-visible contract for all 12 tools.
  3. 03The model compares your intent with each description and uses the input schema to form arguments.
  4. 04The client sends tools/call with one exact tool name and its arguments.
  5. 05index.ts finds that name, then the matching tools.ts handler performs the S3 operation.
List by metadata

Ask: “Show five recently modified notes.” The list_notes description says it can sort by modified date without reading note bodies.

Search inside notes

Ask: “Find blue mango 42 inside my notes.” The search_vault description says it searches the text inside note bodies.

JSON-RPC · the client chooses search_vault
{
"method": "tools/call",
"params": {
"name": "search_vault",
"arguments": {
"query": "blue mango 42"
}
}
}
mcp-server/src/index.ts · exact-name dispatch
const tool = allTools.find(
(t) => t.name === name,
);
if (!tool) {
return fail(
req.id,
-32602,
`Unknown tool: ${name}`,
);
}
const text = await tool.handler(args);
return ok(req.id, {
content: [{ type: "text", text }],
});
The model chooses. The server executes.

The input schema guides the client when it builds arguments. This server does not run one generic JSON Schema validator; each handler checks and normalizes the values it actually uses, then returns text for the model to explain.

Deploy your Vault Brain

LIVE

Follow the four hands-on steps in order. Each one has a result you can check.

HANDS-ONSTEP 1

Configure and validate your stack

GoalSet your local values and confirm the AWS account before creating resources.

This step changes local files only. Stop if the account ID is not yours.

1 · create the private config
npm run configure# Creates terraform/terraform.tfvars only when it does not already exist
2 · edit terraform/terraform.tfvars
project_name = "vault-brain-yourname"
profile = "default"
owner_email = "you@example.com"
region = "us-east-1"
vault_tz = "UTC"
  1. 01Choose a unique lowercase project_name (3 to 40 characters).
  2. 02Set your AWS profile and the owner_email used for Cognito sign-in.
  3. 03Choose one region and an IANA vault_tz, such as Asia/Manila.
3 · validate the complete setup
npm run preflight -- --client claude-web# Use chatgpt instead of claude-web if that is your live client; confirm browser access yourself when prompted
Ready to protect state when

Continue only when preflight says READY, the account ID is yours, and terraform.tfvars is ignored by Git. Confirm any remaining CHECK yourself.

HANDS-ONSTEP 2

Create the remote Terraform state

GoalCreate the private S3 bucket for Terraform state before deploying the app.

This is the first AWS change. Confirm the account and review the plan before typing APPLY.

Two buckets, two jobs

The state bucket holds Terraform's sensitive resource map. The later vault bucket holds Markdown. MCP and Obsidian cannot access the state bucket.

create or reconnect the protected backend
npm run bootstrap-state# Use this same command on Windows, macOS, and Linux
  1. 01Confirm the bucket name, region, and your 12-digit account ID.
  2. 02Review the plan. It should contain only resources that protect the separate state bucket, typically seven on a fresh account. Type APPLY if it matches.
  3. 03If asked, type MIGRATE and approve Terraform's state-copy prompt. The runner compares the complete state content after copying it to S3.
finish signal
STATE BACKEND READY
Next: npm run deploy
Checkpoint

Continue only after STATE BACKEND READY. The bucket must be private, versioned, encrypted, account-bound, and use the S3-native lockfile. Never open or screenshot the state object; it contains secrets.

HANDS-ONSTEP 3

Deploy and set your Cognito password

GoalProvision the MCP server and seed your Markdown vault.

This creates AWS resources. Stop if the plan shows the wrong account, region, or names.

AWS usage is not guaranteed to be free

S3, Lambda, API Gateway, Cognito, and CloudWatch can incur charges. Review your plan and account allowances before typing APPLY.

1 · start the deployment
npm run deploy# Use this same command on Windows, macOS, and Linux
  1. 01Confirm the project, region, AWS identity, and 12-digit account ID.
  2. 02Read the Terraform plan. Type APPLY only if every resource belongs to your stack.
Set your permanent Cognito password

After seeding, npm run deploy asks for a new password and confirmation in the terminal. Input is hidden. Use at least 12 characters with uppercase, lowercase, and a number. Later, sign in with owner_email and this password, not the emailed temporary one. If this stage fails, run npm run set-password from the deployed checkout.

finish signal
DEPLOYMENT COMPLETE
MCP endpoint:
https://<API_ID>.execute-api.<REGION>.amazonaws.com/mcp
Next: npm run smoke
Checkpoint

Continue only after DEPLOYMENT COMPLETE and an HTTPS MCP URL ending in /mcp. The runner seeds only an empty vault and never overwrites existing Markdown.

HANDS-ONSTEP 4

Run the smoke test

GoalCheck the deployed endpoint before connecting an AI client.

Run this from the same checkout. Never publish Terraform state.

test the deployed server
npm run smoke# No arguments required; the runner reads private Terraform outputs through the initialized backend
What it checks

The test verifies the exact 12-tool list and exercises a temporary write, read, and delete round trip. It also checks unauthorized access rejection and public OAuth discovery. It uses a separate test bearer. Your first client login verifies the Cognito path.

finish signal
[PASS] tools/list returns the exact 12-tool contract
[PASS] an unauthenticated call is rejected with 401
ALL SMOKE CHECKS PASSED
OPTIONAL REFERENCEDeployment troubleshooting
REFERENCE

If configuration stops here

Formatting or validation fails

Check the quotes and equals signs in terraform.tfvars. If dependencies or Terraform providers are missing, run npm run preflight -- --fix.

The profile fails

Use the exact profile name saved in terraform.tfvars. For AWS SSO, replace the token in aws sso login --profile YOUR_AWS_PROFILE.

The account is wrong

Stop before deployment. Select the intended AWS profile, update profile, then run the identity check again.

The ignore check is silent

Stop before deployment. The runner must report that terraform.tfvars is excluded from Git. Never commit the real variables file, generated backend configuration, or Terraform state.

REFERENCE

If state bootstrap stops here

The bucket returns 403

Stop. A forbidden bucket is never treated as missing. Confirm the profile, account, region, and S3 permission, then rerun the same command.

The bucket exists without state

The runner fails closed because it cannot prove ownership. If S3 has an older state version or delete marker, restore the intended exact version before retrying. Otherwise inspect the exact bucket before any import or deletion. Never adopt an unfamiliar bucket by guessing.

Migration was interrupted

Rerun npm run bootstrap-state. If the preserved local backup and S3 state have the same content, the runner asks for RECONNECT and keeps both recovery copies. Stop if it reports a conflict.

Local and remote state both exist

The runner compares lineage and serial. It can reconnect only when the remote copy has the same lineage and an equal or newer serial, and it preserves the local file as an ignored migration backup. Any real conflict stops for manual recovery.

Terraform reports a lock

Confirm that no Terraform run is active. Never retry with -lock=false. Force-unlock only your own stale lock after verifying that no plan or apply is running.

Why there is no DynamoDB table

Current Terraform supports native S3 state locking with use_lockfile = true. DynamoDB-based locking is deprecated, so this guide requires Terraform 1.10 or newer instead.

REFERENCE

If deployment stops here

reprint non-secret deployment values if needed
terraform -chdir=terraform output -raw mcp_connector_url# Must end in /mcp
terraform -chdir=terraform output -raw cognito_user_pool_id
terraform -chdir=terraform output -raw cognito_login_email
terraform -chdir=terraform output -raw aws_profile
terraform -chdir=terraform output -raw region
Build fails

Confirm Node.js 22 or newer, then run npm run preflight -- --fix. Fix the first dependency or TypeScript error before running npm run deploy again.

Terraform denies access

Refresh AWS SSO if needed, rerun the identity check, and confirm the selected profile can manage IAM, S3, Lambda, API Gateway, Cognito, and CloudWatch Logs. The backend needs ListBucket; GetObject and PutObject for the state object; and GetObject, PutObject, and DeleteObject for its .tflock object. The runner also checks version history, which requires ListBucketVersions.

A name already exists

Choose a different lowercase project_name, run validation again, then restart the deployment. S3 bucket and Cognito domain names must be unique.

Seeding cannot list S3

The runner fails closed and does not assume that the bucket is empty. Fix the profile, session, or bucket access, then rerun npm run deploy. Existing Markdown remains untouched.

The state lock is busy

Wait for the other Terraform run to finish, then retry. Do not add -lock=false. A lock protects the state from two writers changing it at once.

REFERENCE

If the password or smoke test fails

Password setup is rejected

Run npm run set-password only as a retry. Use 12 or more printable ASCII characters with uppercase, lowercase, and a number, then enter the same value at the hidden confirmation prompt.

Terraform output fails

Run from the matching repository checkout. On a new computer, recreate the same terraform.tfvars, then run npm run bootstrap-state to reconnect to the verified backend before retrying. The outputs and smoke-test bearer come from remote state.

A tool check fails

Retry npm run smoke once in case the endpoint or network was briefly unavailable. If the same contract or tool failure repeats, rerun npm run deploy to rebuild, review the new plan, and apply it safely. Do not continue to client setup until the exact 12-tool check passes.

Auth does not return 401

Stop. The protected endpoint must reject a request without credentials. Review the deployed Lambda configuration and authorizer path before connecting a client.

Connect one AI client

LIVE

Pick Claude web or ChatGPT. Both use the same protected MCP endpoint.

DISCUSSION

One server, two client paths

Claude web

Add a custom connector, complete Cognito sign-in, and enable Vault Brain in a conversation.

ChatGPT

Create an MCP app from Plugins, add the public /mcp endpoint, then complete browser login.

Choose one now

Both clients discover the same tools and authenticate against the same server. Complete one path now. If you already have a second client, use it later for the optional portability proof.

DISCUSSION

Why the login uses PKCE with S256

Your client handles this automatically when you sign in through Cognito.

PKCE with S256 is not a 256-bit public key. The client keeps a one-time secret, sends only its SHA-256 fingerprint during login, then proves it still holds the secret when exchanging the authorization code.

PKCE with S256Proof Key for Code Exchange
  1. 01

    Keep

    Create a one-time verifier

    The client generates a random secret and keeps it on the device.

  2. 02

    Commit

    Send its S256 fingerprint

    Only this S256 fingerprint travels with the authorization request.

    BASE64URL(SHA256(verifier))
  3. 03

    Authorize

    Sign in and receive a code

    Cognito authenticates the owner and returns a short-lived authorization code.

  4. 04

    Prove

    Exchange code plus verifier

    Cognito recomputes the challenge. A match releases the access token.

S256 means SHA-256. It is not a public key. A stolen authorization code is useless without the original verifier.
You do not calculate this

Claude web or ChatGPT handles PKCE. You sign in through Cognito; Lambda later verifies the access token before allowing a tool call.

HANDS-ON

Path A: Connect Claude web

GoalYou use Claude in your browser and want it to read your Vault Brain through MCP.

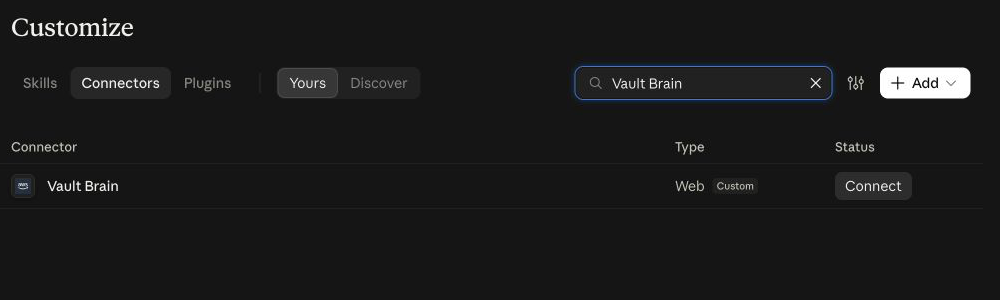
  1. 01In Claude on the web, open Customize → Connectors. If Vault Brain is already under Yours, open it and choose Connect. Otherwise, select + → Add custom connector.
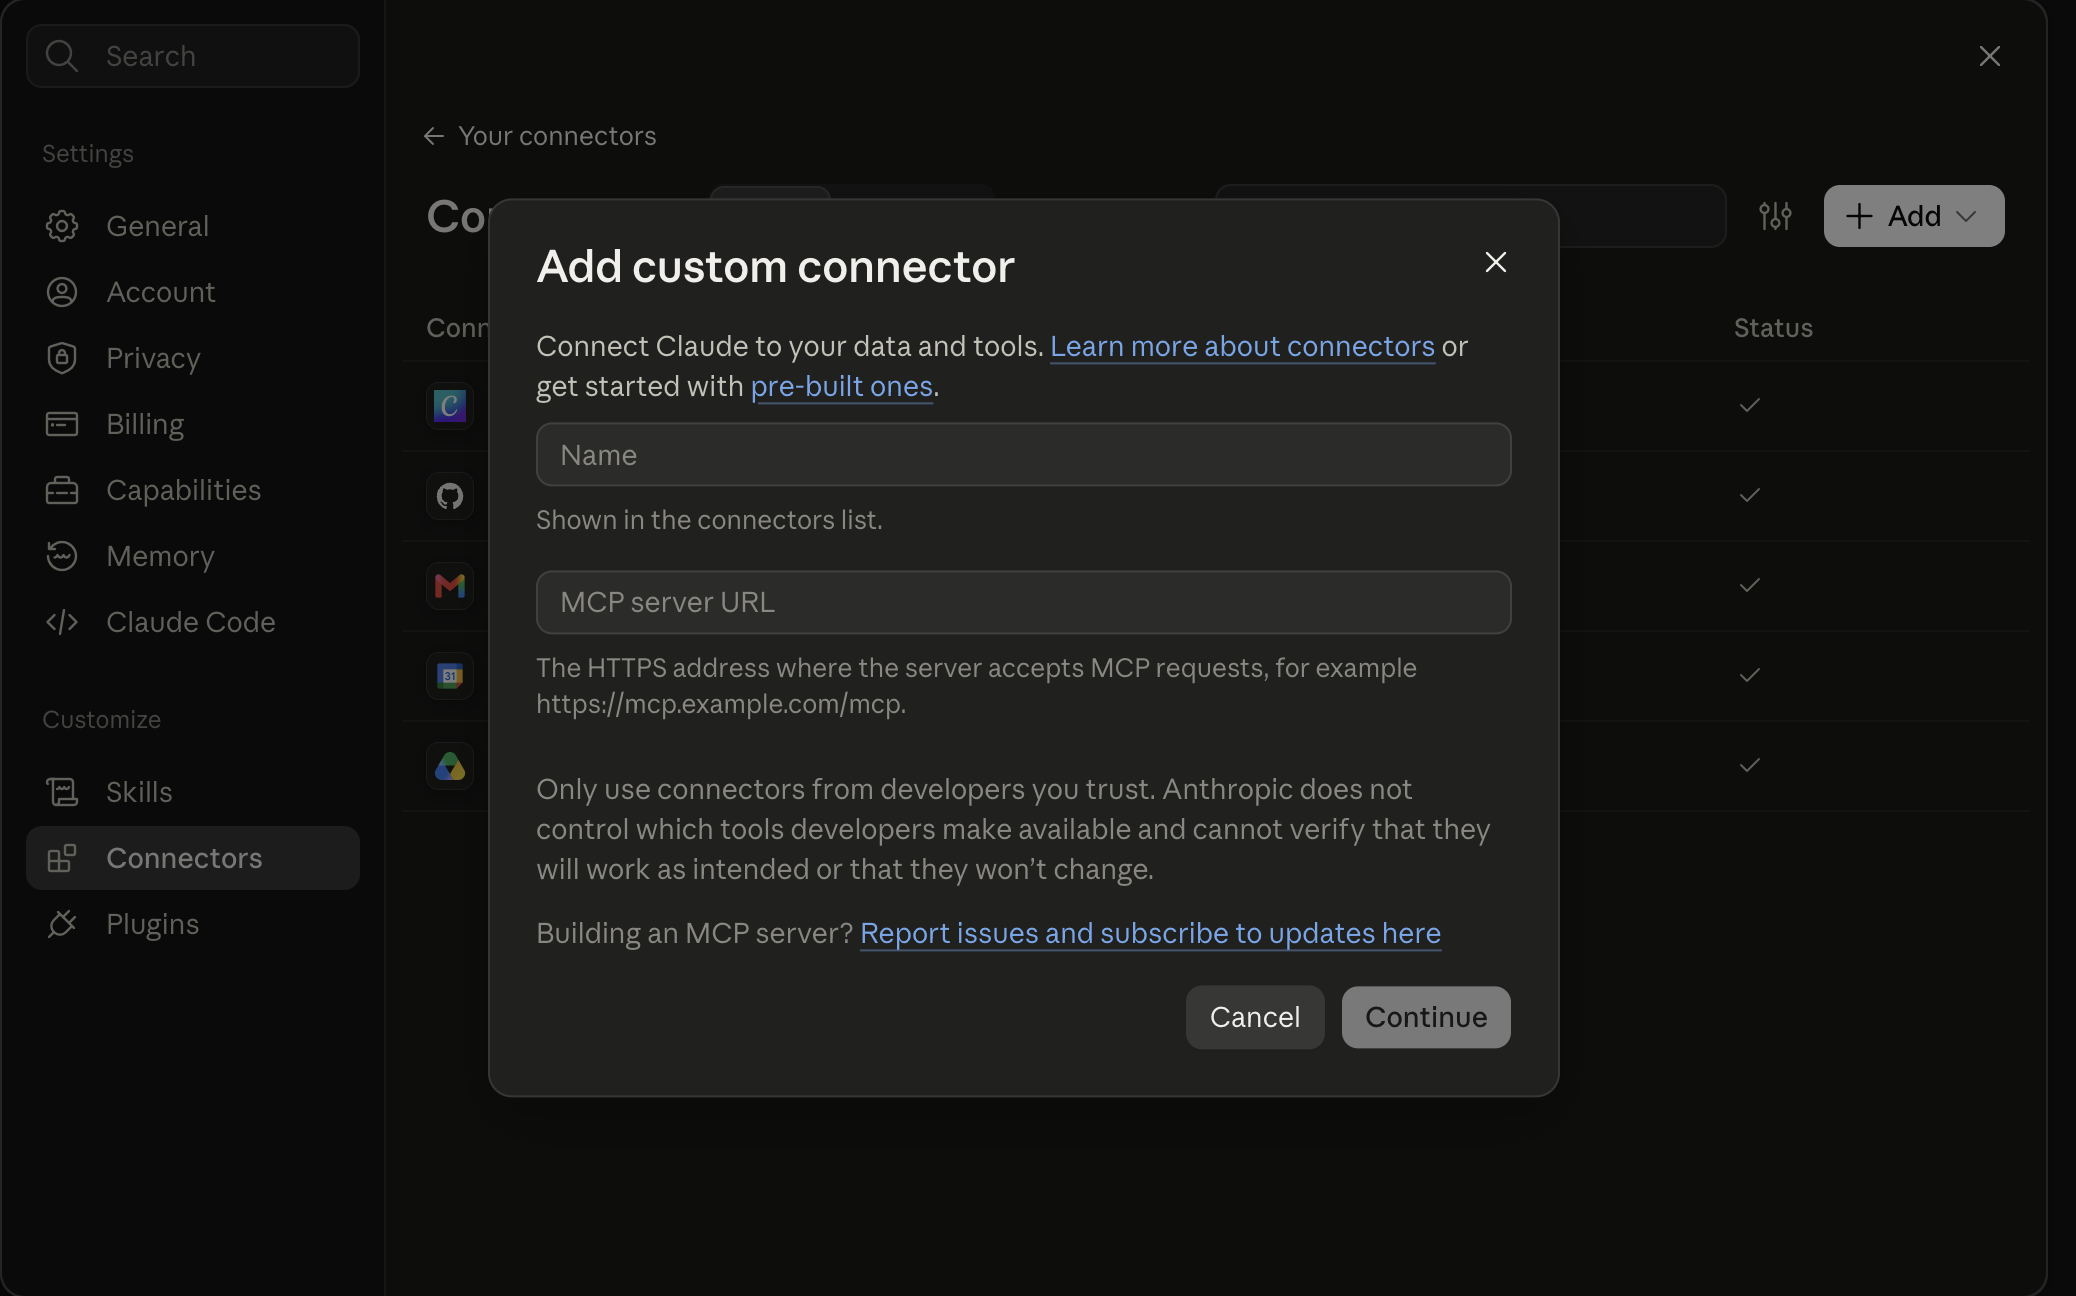
  2. 02If adding it now, name it Vault Brain, paste the public HTTPS URL from npm run deploy including /mcp, choose Continue, then review and confirm the connector.
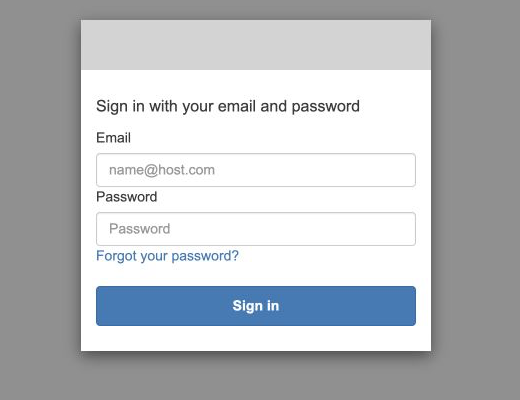
  3. 03Choose Connect when prompted. Sign in to Cognito with owner_email and the permanent password set during deployment, not an emailed temporary password.
  4. 04Open a new Claude conversation. Select + → Connectors and confirm Vault Brain is enabled for that chat.
Account access

Claude supports custom remote MCP connectors on Free, Pro, and Max plans; Free allows one custom connector. On Team or Enterprise, an organization owner adds the connector before members connect it. If you cannot add one, use the ChatGPT path for the live test.

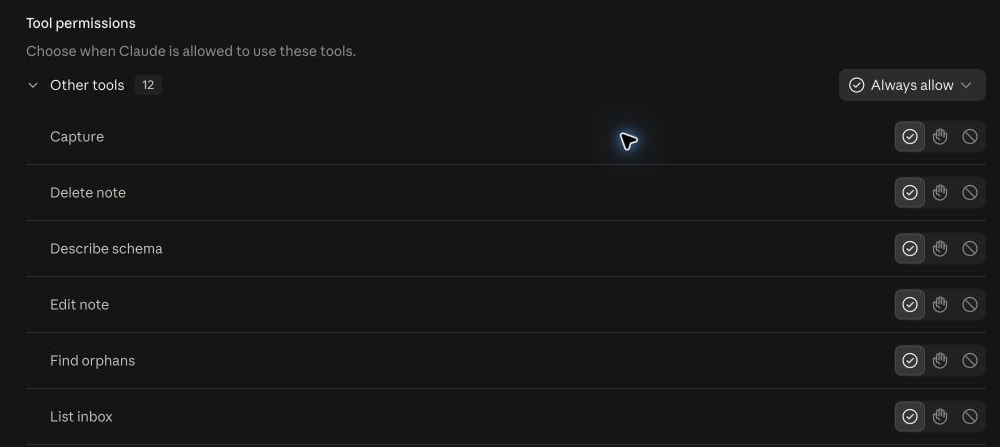
Review tool permissions

In the captured Claude account, all 12 tools initially showed Always allow, including write and delete actions. Before using real notes, set mutating tools such as Capture, Write, Edit, Move, Trash, and Delete to Needs approval if you want a confirmation for each action.

Step-by-step screenshots
  1. 01
    Customize

    Open Connectors in Claude web

    Under Customize → Connectors, filter Yours for Vault Brain, or use Add to register a new connector.

    Claude web Customize Connectors page filtered to the registered Vault Brain connectorOpen full size
  2. 02
    Connection

    Add the Vault Brain URL

    Enter Vault Brain in Name and your public HTTPS /mcp URL in MCP server URL, then choose Continue. This genuine capture shows the blank form.

    Claude's Add custom connector form with blank Name and MCP server URL fieldsOpen full size
  3. 03
    Browser

    Classic Cognito owner sign-in

    After the redirect, this same Cognito screen handles sign-in for either client. Enter your owner email and permanent password privately.

    Empty Cognito Hosted UI sign-in form with Email and Password fieldsOpen full size
  4. 04
    Tools

    Confirm 12 discovered tools

    Claude lists 12 Vault Brain tools after Cognito sign-in. This capture predates permission hardening. Set write and delete tools to Needs approval before using real notes.

    Claude tool permissions showing a group of 12 Vault Brain tools after connectionOpen full size
  5. 05
    Conversation

    Enable Vault Brain in a chat

    Open + → Connectors in a new chat and confirm the Vault Brain toggle is on.

    Vault Brain enabled in Claude's Connectors menuOpen full size
  6. 06
    Read-only test

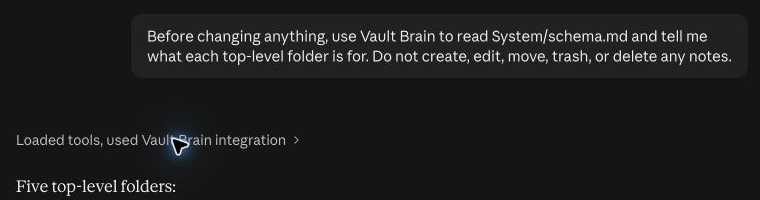
    See a real Vault Brain tool call

    Claude used Vault Brain to answer a folder question. This crop omits the private note contents.

    Claude used the Vault Brain integration for a read-only schema questionOpen full size

Then ask: “Before changing anything, use Vault Brain to read System/schema.md and tell me what each top-level folder is for. Do not change any notes.”

Reference: Claude's custom connector guide.

Checkpoint

Vault Brain is enabled in the Claude conversation, and the rules prompt returns an answer grounded in System/schema.md.

HANDS-ON

Path B: Connect ChatGPT

GoalYou use ChatGPT and want to connect the same Vault Brain without giving the client direct access to S3.

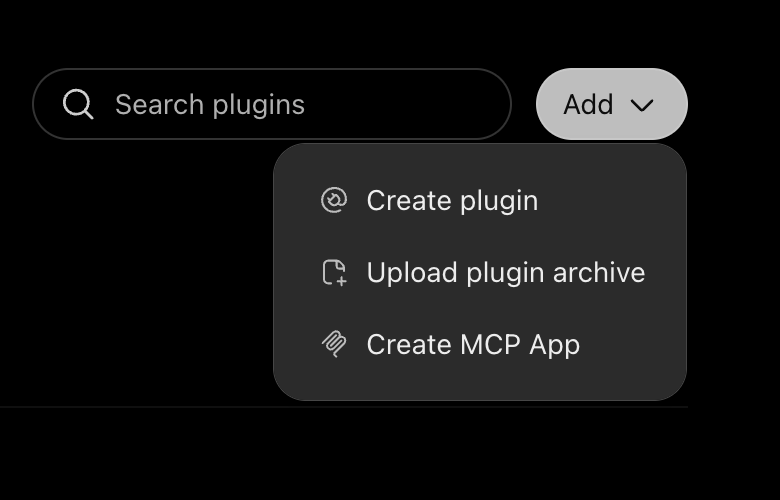
  1. 01Open ChatGPT Plugins → Add → Create MCP App. If Add is unavailable, check Settings → Security and login for Developer mode; account and workspace controls can vary.
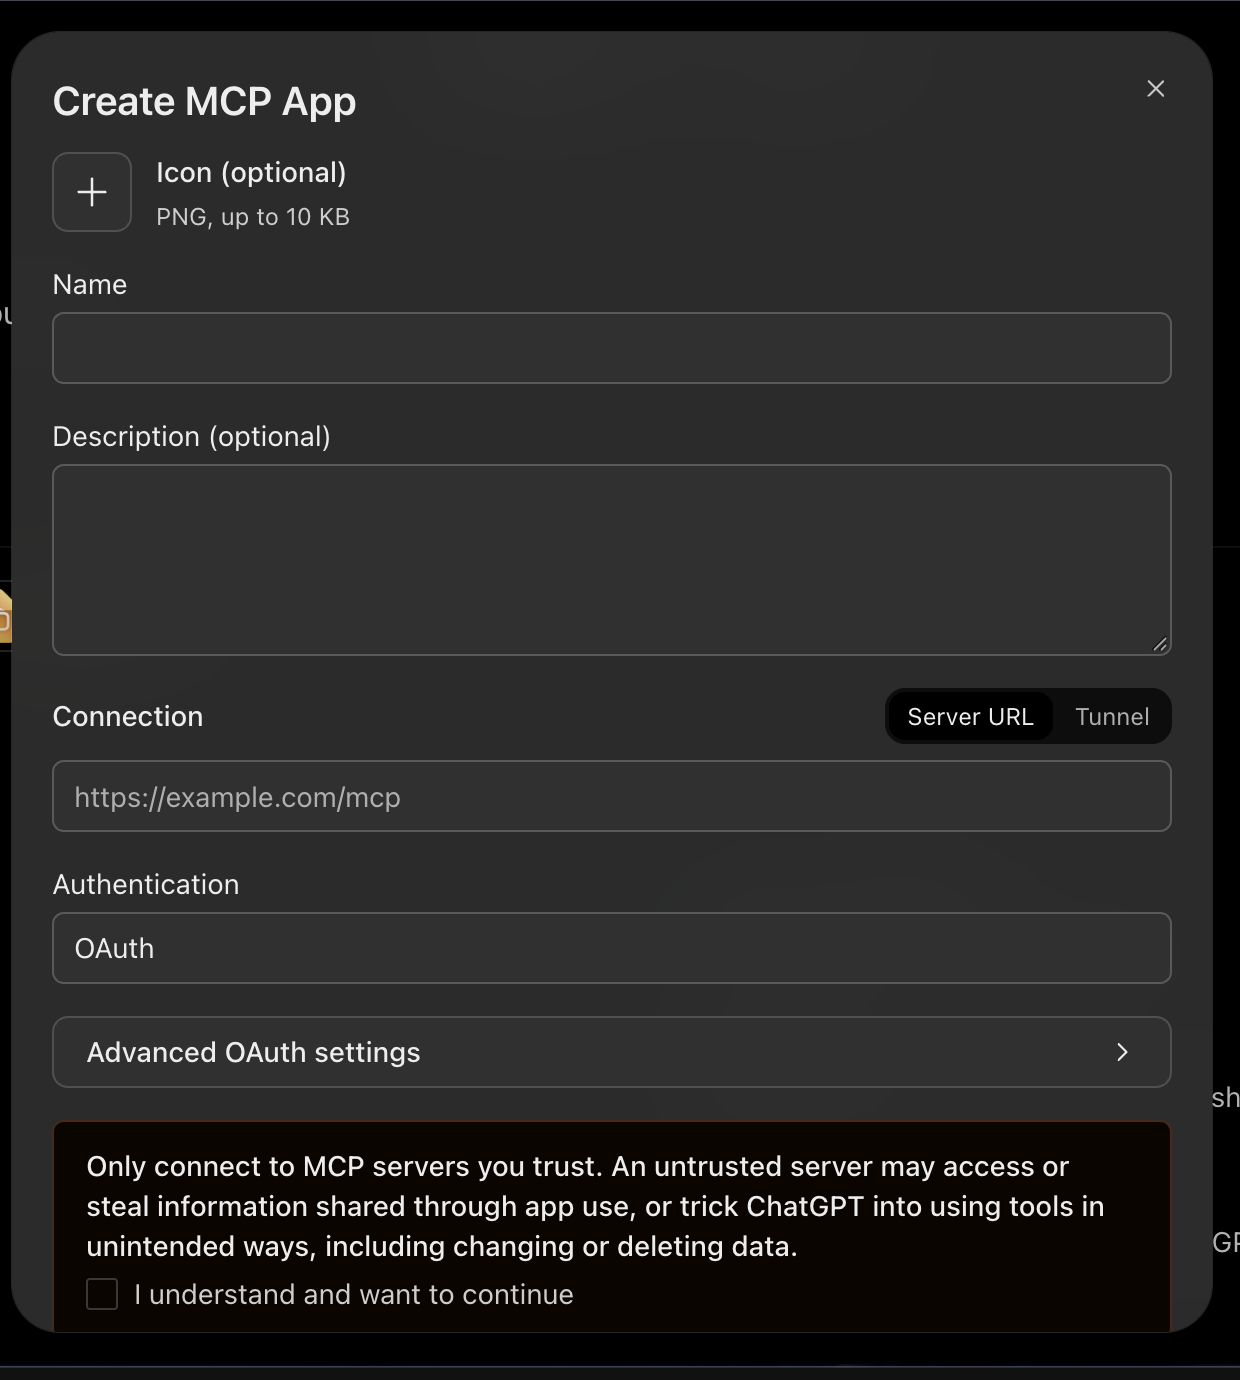
  2. 02Name it Vault Brain. Under Connection, choose Server URL, paste your public HTTPS endpoint including /mcp, and select OAuth authentication.
  3. 03Read the custom-server warning, acknowledge it only for your own deployed endpoint, then choose Create. Open the new Vault Brain app and choose Connect.
  4. 04Sign in to Cognito with owner_email and the permanent password from deployment, not the emailed temporary password.
  5. 05Open the app's tool list and confirm that ChatGPT discovered all 12 tools. Then add Vault Brain to a new conversation from the tools menu.
Check account access first

OpenAI's documentation describes a Developer mode toggle under Security and login. In the live account used for these captures, Add was available without a visible toggle there. If your account cannot create an MCP app, use the Claude web path for the live test.

Step-by-step screenshots
  1. 01
    Plugins

    Choose Create MCP App

    In ChatGPT Plugins, open Add and select Create MCP App. This is a real capture from the current interface.

    ChatGPT Plugins Add menu showing Create MCP AppOpen full size
  2. 02
    Connection

    Open the MCP app form

    Enter Vault Brain, choose Server URL and OAuth, then paste the public URL printed by npm run deploy with its final /mcp path.

    Blank Create MCP App form showing Name, Server URL, OAuth, and the trust warningOpen full size
  3. 03
    Connect

    Connect the created app

    After Create, open Vault Brain under Plugins and choose Connect to begin owner sign-in.

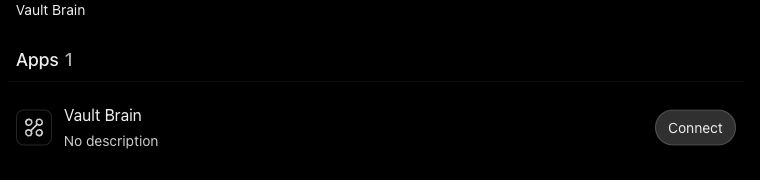
    Newly created Vault Brain app in ChatGPT Plugins with a Connect buttonOpen full size
  4. 04
    Browser

    Authorize through classic Cognito

    After choosing Connect, use the same Cognito sign-in. Enter your owner email and permanent password privately; never share the authorization URL.

    Empty Cognito Hosted UI sign-in form with Email and Password fieldsOpen full size
  5. 05
    Tools

    Confirm all 12 tools

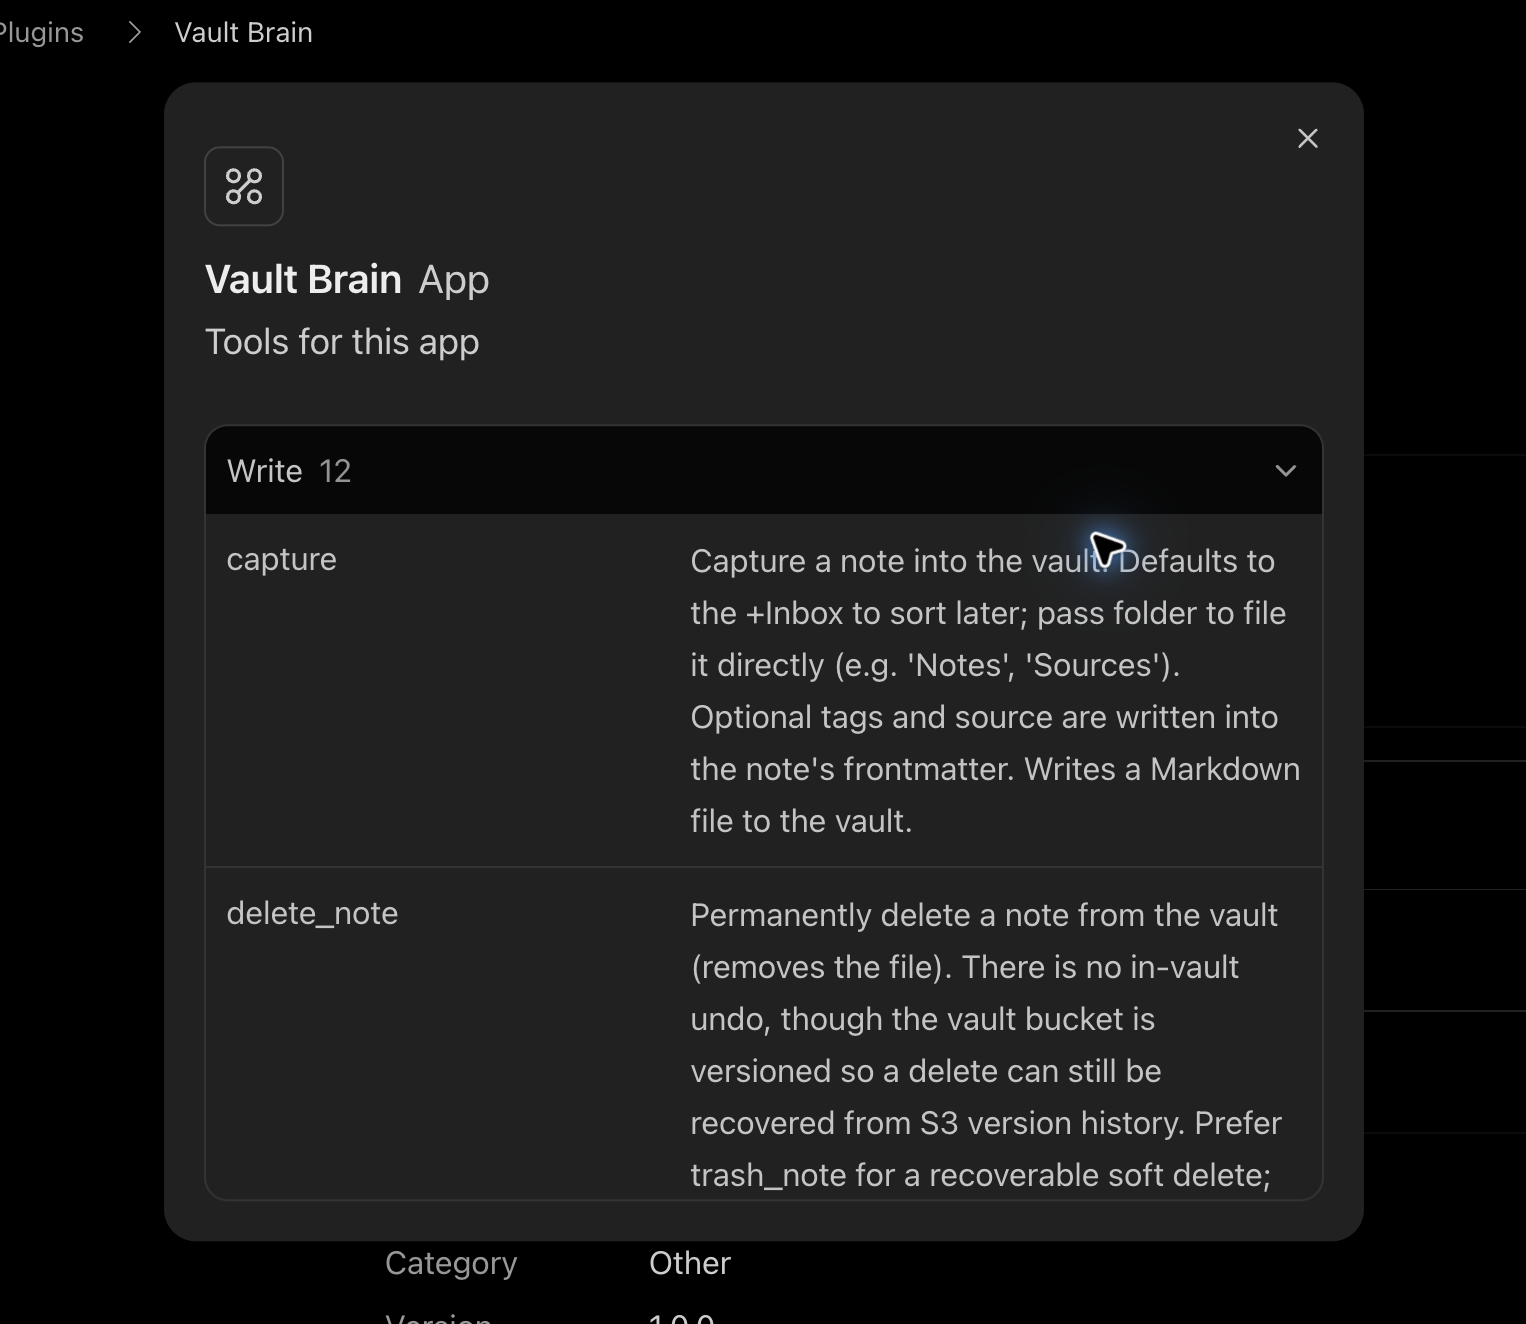
    Open Vault Brain under Plugins and review the 12 discovered tool names. In this capture, ChatGPT groups them under Write; read each description before allowing a change. Then add Vault Brain to a new conversation from the tools menu.

    ChatGPT Vault Brain app showing 12 discovered tools and their descriptionsOpen full size

Then ask: “Before changing anything, read this vault's rules and tell me what each top-level folder is for.”

Reference: OpenAI's connection guide.

Checkpoint

Vault Brain appears in the tools menu, its tools are discovered, and the rules prompt returns an answer grounded in System/schema.md.

OPTIONAL REFERENCEOAuth details and connection help
REFERENCE

The OAuth path behind the login

  1. 01The client calls /mcp and receives 401 Unauthorized with a link to OAuth metadata.
  2. 02The client reads the protected-resource and authorization-server metadata.
  3. 03The /register bridge validates the client's callback URL and registers it with the shared public Cognito client.
  4. 04Cognito runs the authorization-code flow with PKCE S256. No client secret is stored in the AI client.
  5. 05The client sends the resulting access token to /mcp. Lambda verifies it before running a tool.
REFERENCETAKE-HOME

Optional: Connect Claude Code later

Claude Code is a separate coding client. Its terminal sign-in is not required for either live browser path. If you use it later, connect the same deployed Vault Brain URL.

terminal
claude mcp add --transport http --scope user --callback-port 9000 vault-brain YOUR_MCP_URL# Use the same HTTPS URL ending in /mcp
claude mcp login vault-brain# Complete Cognito sign-in with the permanent owner password
claude mcp list# Look for vault-brain: Connected

Reference: Claude Code MCP documentation.

REFERENCE

If a client does not connect

The server is unreachable

Reprint mcp_connector_url from Terraform and confirm that the client uses the complete public HTTPS URL ending in /mcp.

Login loops or returns 401

Start a fresh authorization from the client. Use owner_email and the permanent password set during deployment, not the emailed temporary password.

Forgot the permanent password

Choose Forgot password? on the Cognito sign-in page and use your verified owner email, or run npm run set-password from the deployed checkout. Never share the new password.

Tools are old or missing

Disconnect and reconnect the server so the client runs discovery again. In ChatGPT, refresh the connection metadata; in Claude, check that Vault Brain is enabled for the conversation.

Developer mode is unavailable

The ChatGPT control can depend on account or workspace policy. Use the Claude web path instead of changing the server's security settings.

Do not weaken callback validation

Remote registration accepts approved ChatGPT, OpenAI, Claude, and Anthropic HTTPS hosts plus localhost callbacks. If another callback is rejected, verify the client documentation before changing that allowlist.

Prove that it works

LIVE

Capture one memorable sentence, find it again, then optionally retrieve it from a second client.

HANDS-ON

The four-prompt test

GoalYou want proof that your first client can write to the vault and retrieve the same information again.

Use the phrase “blue mango 42” as a simple test marker. It has no technical meaning. It only makes the note easy to find.

  1. 01Ask: “What is waiting in my vault inbox?”
  2. 02Ask: “Capture a note titled Vault Brain check. Its body is: The vault remembers blue mango 42. Tag it vault-brain-test and tell me the saved path.”
  3. 03Ask: “Find the exact phrase blue mango 42 and tell me which note contains it.”
  4. 04Ask: “Read that complete note back to me.”
Checkpoint

The client reports a saved path, finds blue mango 42, and reads the complete note from that same path.

OPTIONAL REFERENCEMore prompts and a second-client test
OPTIONAL HANDS-ON

Optional: switch clients and prove portability

GoalThe first client created the note. Now prove that the memory belongs to the vault, not to that conversation.

  1. 01Connect the other client using its activity in the previous chapter.
  2. 02Start a fresh conversation without copying any chat history.
  3. 03Ask: “Find the note containing blue mango 42. Give me its path and summarize it.”
Checkpoint

The second client returns the same path and test phrase even though it never saw the first conversation.

REFERENCE

Prompt reference for all 12 tools

These are test prompts, not the normal way to speak to the vault. Use them in order with sample data only. The tool label shows the route we expect the model to choose.

Start with the 10 safe checks

Copy the exact path returned by capture and use it wherever the prompts show <CAPTURED_PATH>. The optional removal checks come last and use disposable notes only.

01describe_schema
read
“Read this vault's own rules and explain what each top-level folder is for.”

Returns and summarizes System/schema.md.

02list_inbox
read
“What notes are waiting in my inbox? List their paths.”

Lists the Markdown notes under +Inbox/.

03capture
write
“Capture a note titled Vault Brain check. Its body is: The vault remembers blue mango 42. Tag it vault-brain-test and tell me the saved path.”

Creates a dated inbox note and returns its exact path.

04search_vault
read
“Find the exact phrase blue mango 42. Return the matching path and snippet.”

Finds the captured note and shows the matching line.

05read_note
read
“Read the complete note at <CAPTURED_PATH>. Do not change it.”

Returns the complete note with its frontmatter.

06edit_note
write
“In <CAPTURED_PATH>, replace blue mango 42 with blue mango 43. Change nothing else.”

Reports one exact replacement.

07list_notes
read
“Show the five most recently modified Markdown notes. Include each path and modified time, but not the note bodies.”

Returns metadata for no more than five notes.

08write_note
write
“Create +Inbox/vault-brain-scratch.md with the heading Vault Brain scratch. Do not overwrite an existing file.”

Creates only the named scratch note.

09move_note
write
“Move +Inbox/vault-brain-scratch.md to Notes/vault-brain-scratch.md. Do not overwrite anything.”

Moves the exact file to Notes/.

10find_orphans
read
“Find notes with no incoming wiki links and links whose target is missing. Do not change anything.”

Returns orphan and broken-link results.

Optional removal checks

Continue only with the exact disposable paths created above. trash_note is the normal recoverable choice. delete_note removes the current object view, while S3 version history remains the recovery path during its retention window.

01trash_note
delete
“Move <CAPTURED_PATH> to trash so it stays recoverable. Tell me its recovery path.”

Moves the captured note into .trash/.

02delete_note
delete
“Delete only Notes/vault-brain-scratch.md from the current vault view. Do not remove any other note.”

Deletes only the disposable scratch note; S3 version history remains the recovery path.

See the same vault in Obsidian

LIVE

Complete the loop: sync your S3 Markdown to Obsidian and back.

DISCUSSION

Obsidian is a view, not the source of truth

S3 remains the durable vault. The MCP server gives AI clients authenticated tools, while Remotely Save synchronizes the same Markdown into a local Obsidian folder for you to read and edit.

Two paths to the same files

AI clients use the Cognito-protected /mcp endpoint. Obsidian uses bucket-scoped sync credentials. Obsidian does not replace MCP authentication.

HANDS-ONSTEP 1

Connect Obsidian to your S3 vault

GoalConnect a new empty Obsidian vault to the same Markdown used by MCP.

Verified against Remotely Save 0.5.25. Keep automatic sync off until manual sync works.

Before enabling the plugin

Remotely Save is a community plugin. Use a new empty vault. Its local data.json contains sync credentials, so keep it private.

  1. 01Create a new, empty Obsidian vault named Vault Brain.
  2. 02Open Settings → Community plugins. Read the warning, then select Exit Restricted mode.
  3. 03Select Browse, search for Remotely Save by remotely-save, then choose Install and Enable.
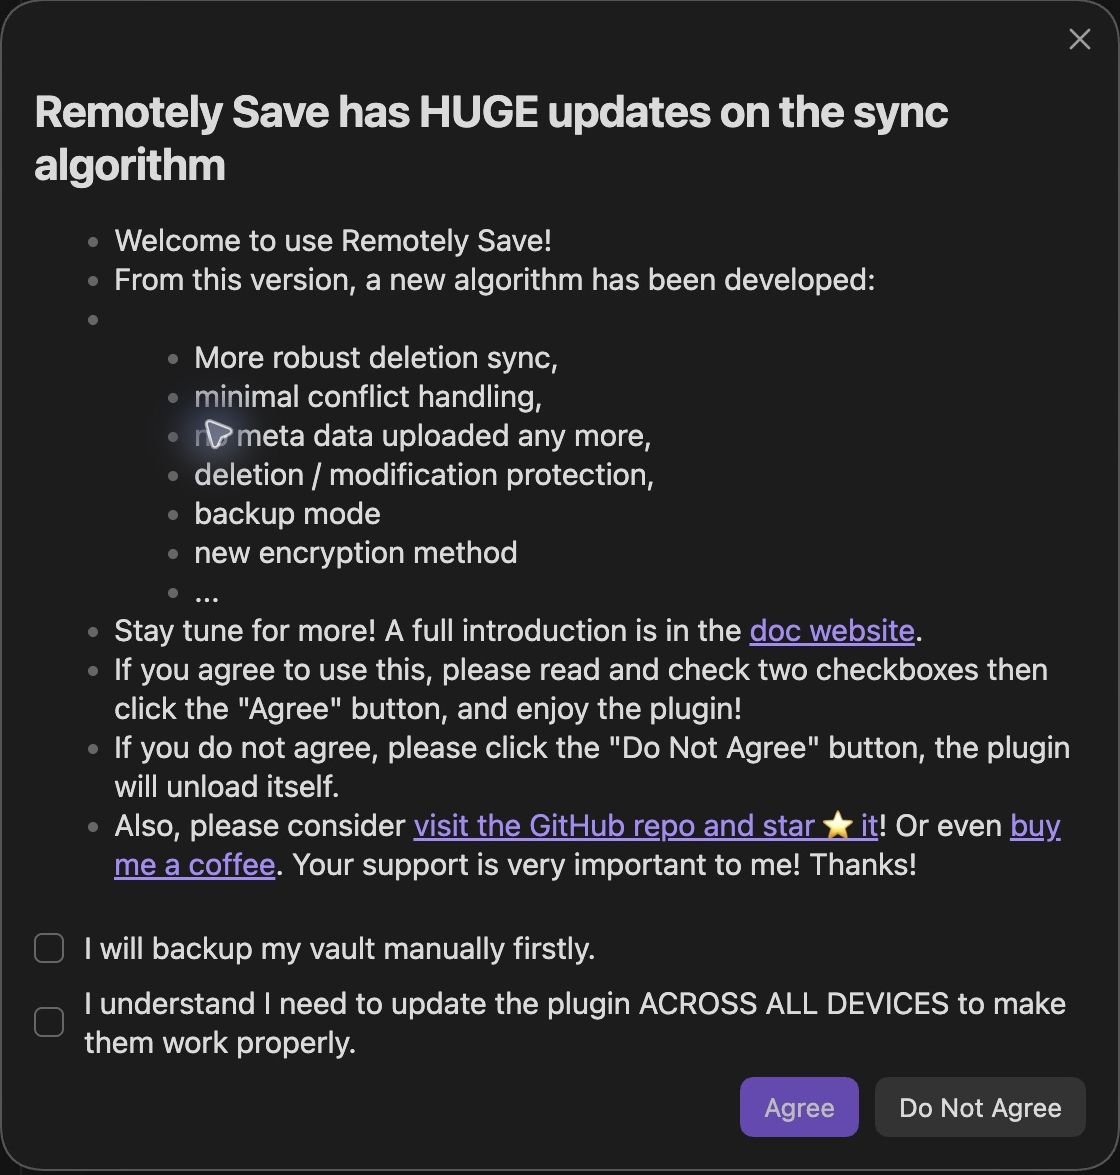
  4. 04Read the first-run sync warning. Back up the new vault folder, confirm you will keep the plugin updated on every device, then select both acknowledgements and choose Agree.
  5. 05Open Settings → Remotely Save and choose S3 or compatible as the remote service.
1 · retrieve settings on a private screen
terraform -chdir=terraform output -raw vault_bucket
terraform -chdir=terraform output -raw region
terraform -chdir=terraform output -raw sync_access_key_id# Sensitive
terraform -chdir=terraform output -raw sync_secret_access_key# Sensitive
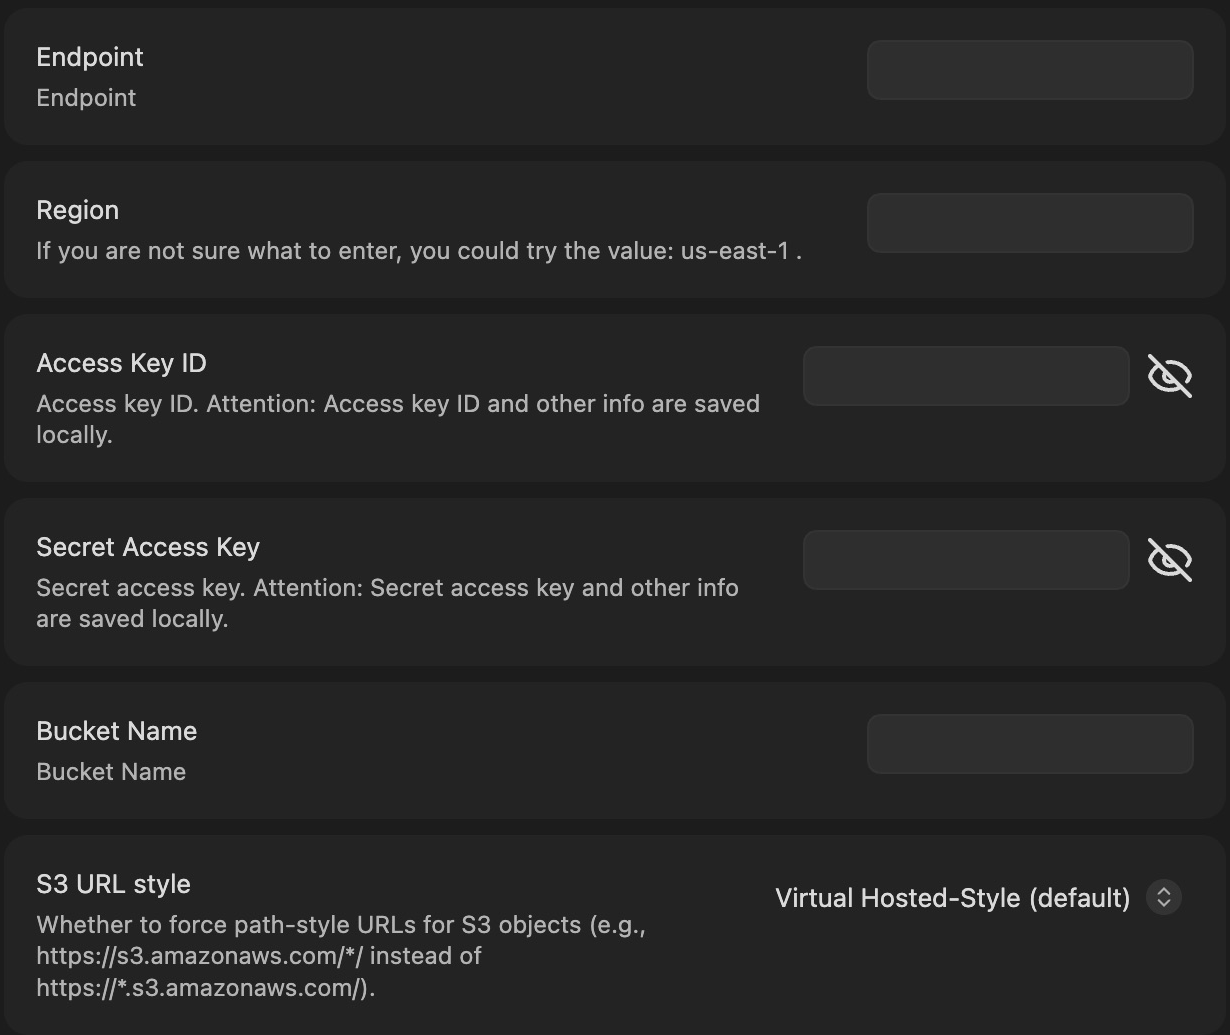
  1. 01Enter Endpoint as https://s3.YOUR_REGION.amazonaws.com, then enter the matching Region, Access Key ID, Secret Access Key, and Bucket Name from Terraform.
  2. 02Keep Virtual Hosted-Style. Leave Remote Prefix and Encryption Password blank, disable Sync Config Dir, and keep Bidirectional sync.
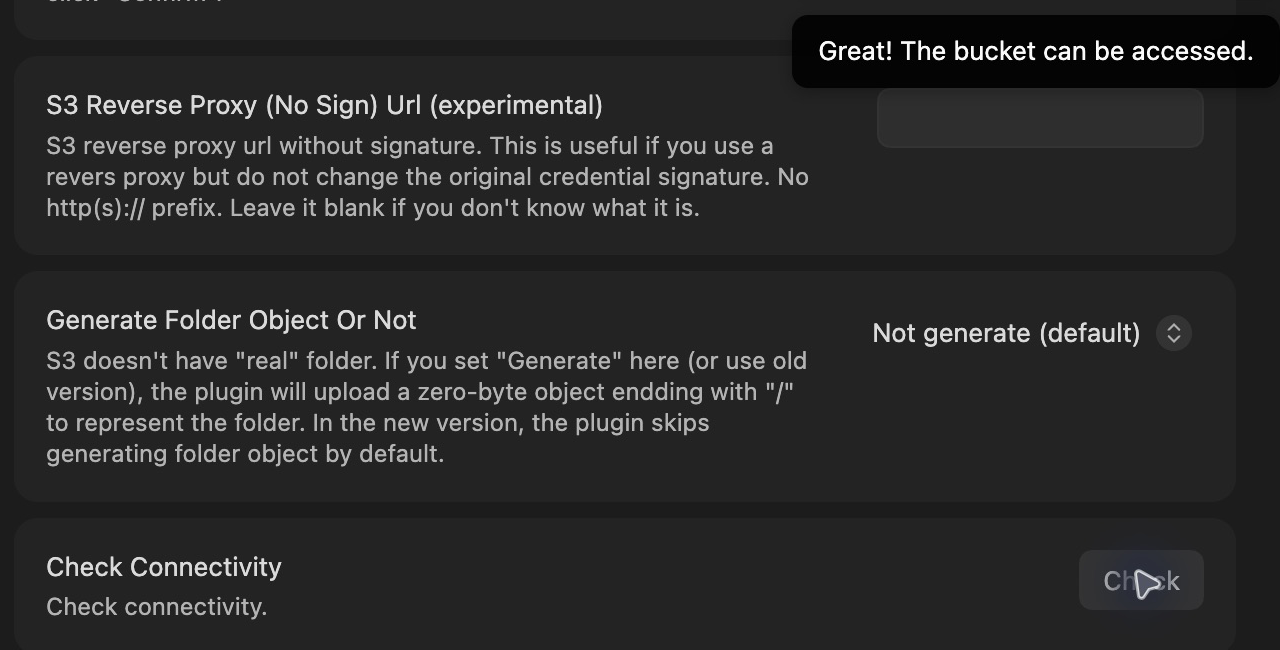
  1. 01Under Check Connectivity, select Check. Continue only after “Great! The bucket can be accessed.”
  2. 02Run Remotely Save: start sync from the command palette and wait for the completion notice.
  3. 03Open +Inbox/welcome.md and System/schema.md in Obsidian.
Step-by-step screenshots
  1. 01
    Community plugins

    Exit Restricted mode

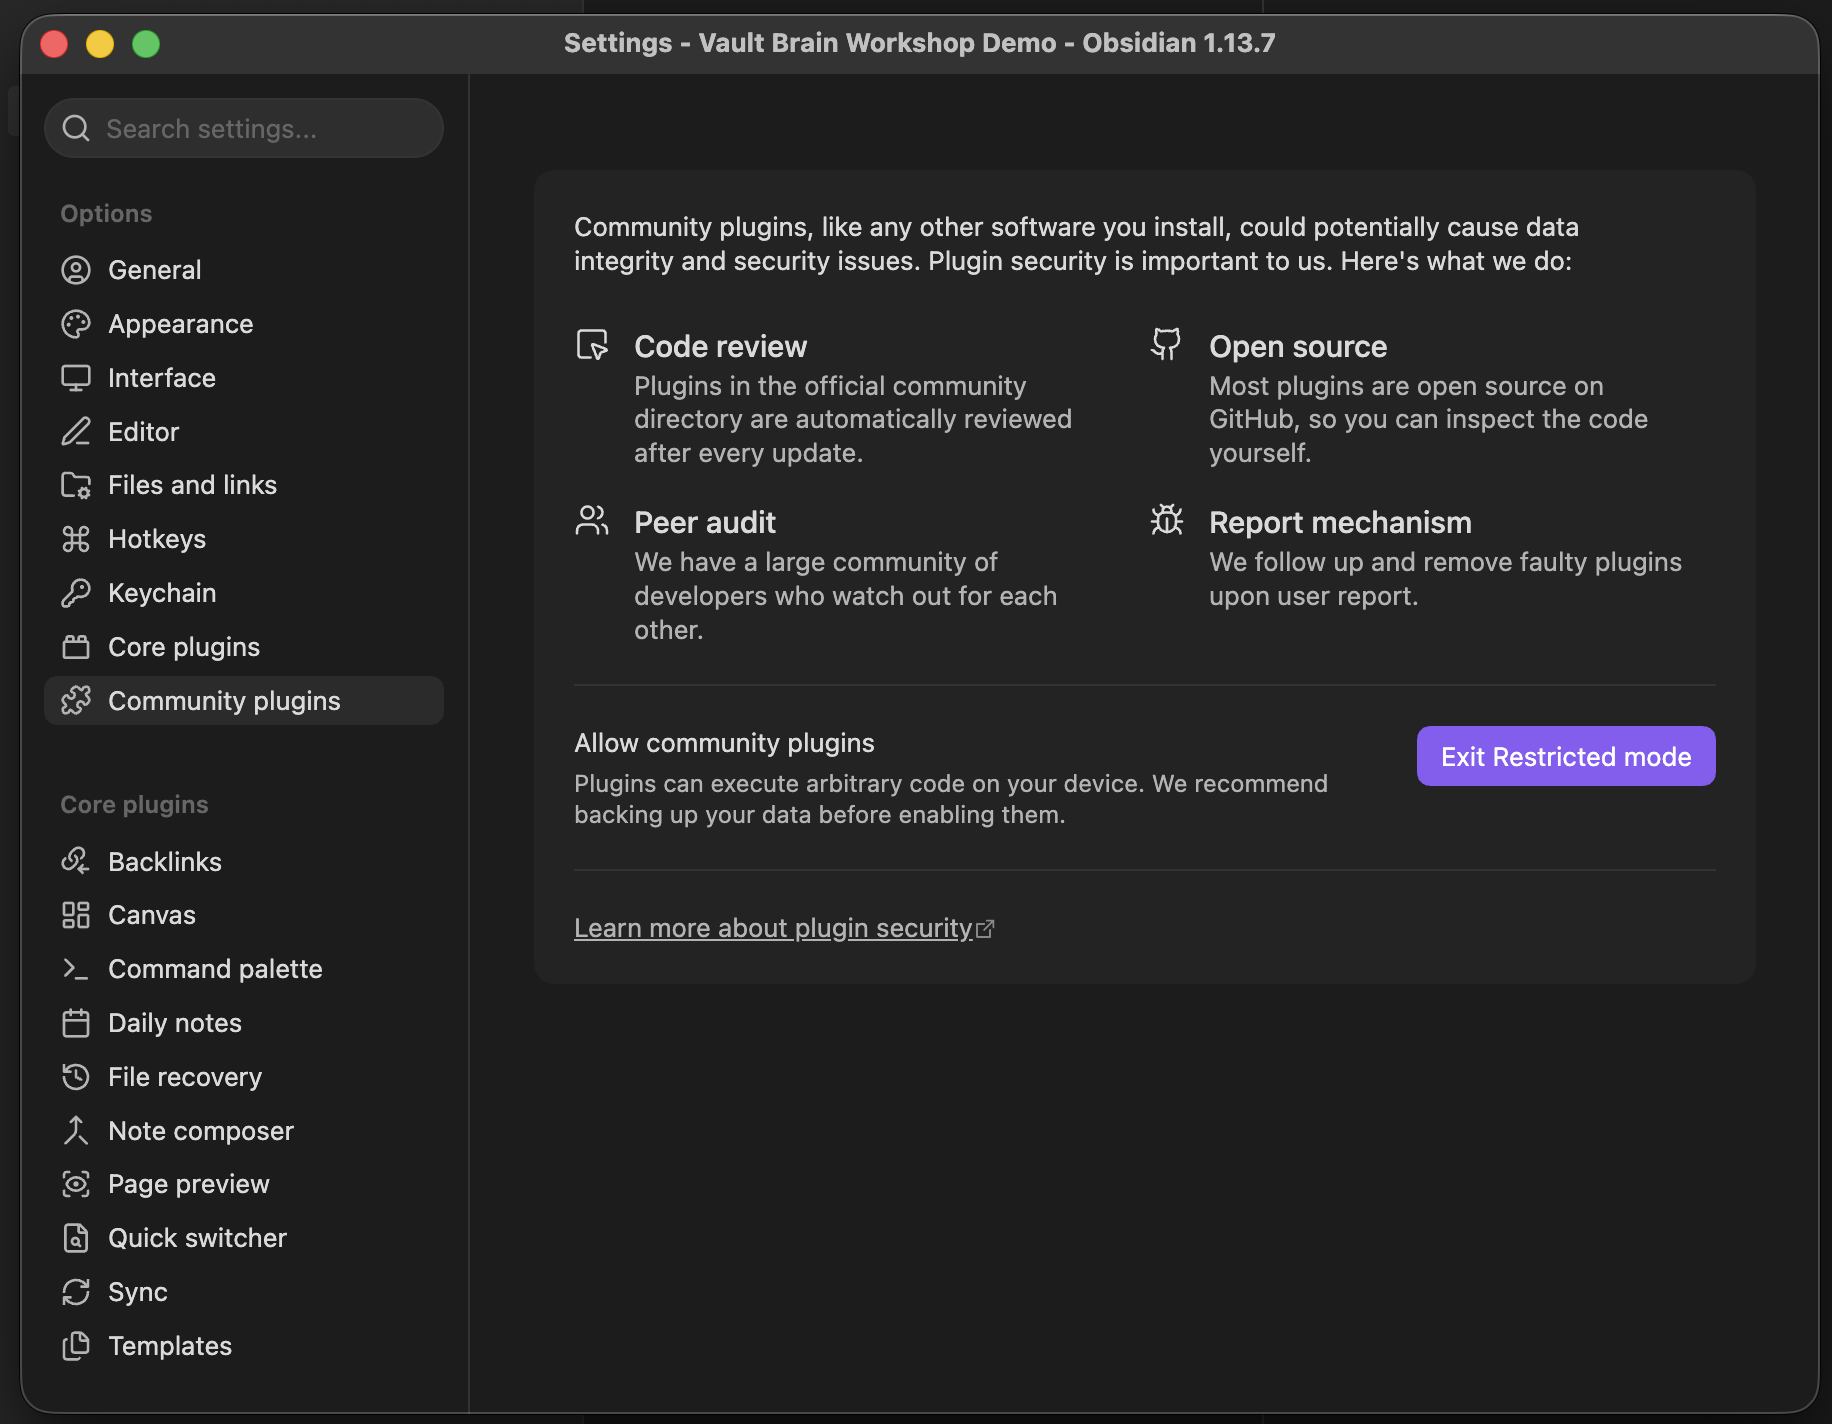
    In the new empty vault, open Settings → Community plugins, review the warning, then select Exit Restricted mode.

    Obsidian settings with Community plugins selected and the Exit Restricted mode button visibleOpen full size
  2. 02
    Browse

    Find the correct Remotely Save plugin

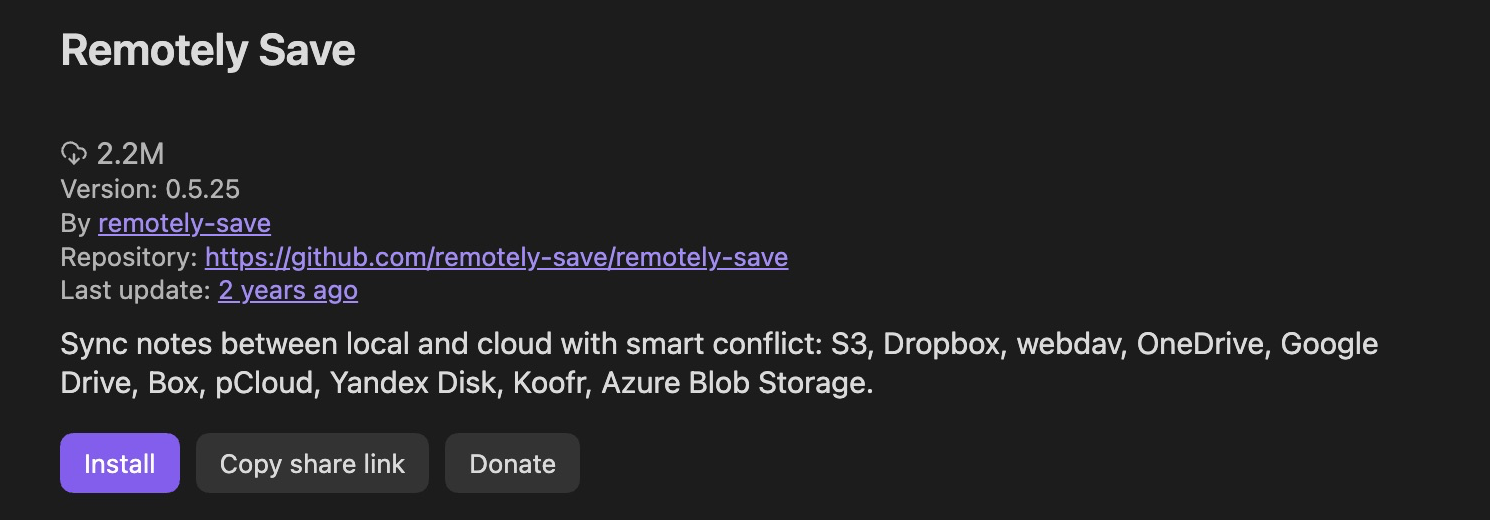
    Select Browse, then choose Remotely Save by remotely-save. Check the publisher before selecting Install.

    Obsidian Community plugins listing for Remotely Save 0.5.25 by remotely-save with Install buttonOpen full size
  3. 03
    First run

    Read the first-run safety notice

    Back up the new vault folder first. The plugin asks you to acknowledge that backup and keep its version aligned across devices before choosing Agree.

    Real Remotely Save first-run dialog with backup and cross-device update acknowledgements before AgreeOpen full size
  4. 04
    Settings

    Find the five S3 fields

    In Settings → Remotely Save, enter Endpoint, Region, Access Key ID, Secret Access Key, and Bucket Name. This real capture leaves all values blank.

    Real Remotely Save S3 settings showing blank Endpoint, Region, Access Key ID, Secret Access Key, and Bucket Name fieldsOpen full size
  5. 05
    Connectivity

    Success notice appears

    Select Check and watch for the temporary bucket-access success notice.

    Real Remotely Save Check Connectivity result showing that the workshop S3 bucket can be accessedOpen full size
  6. 06
    First sync

    Starter notes arrive

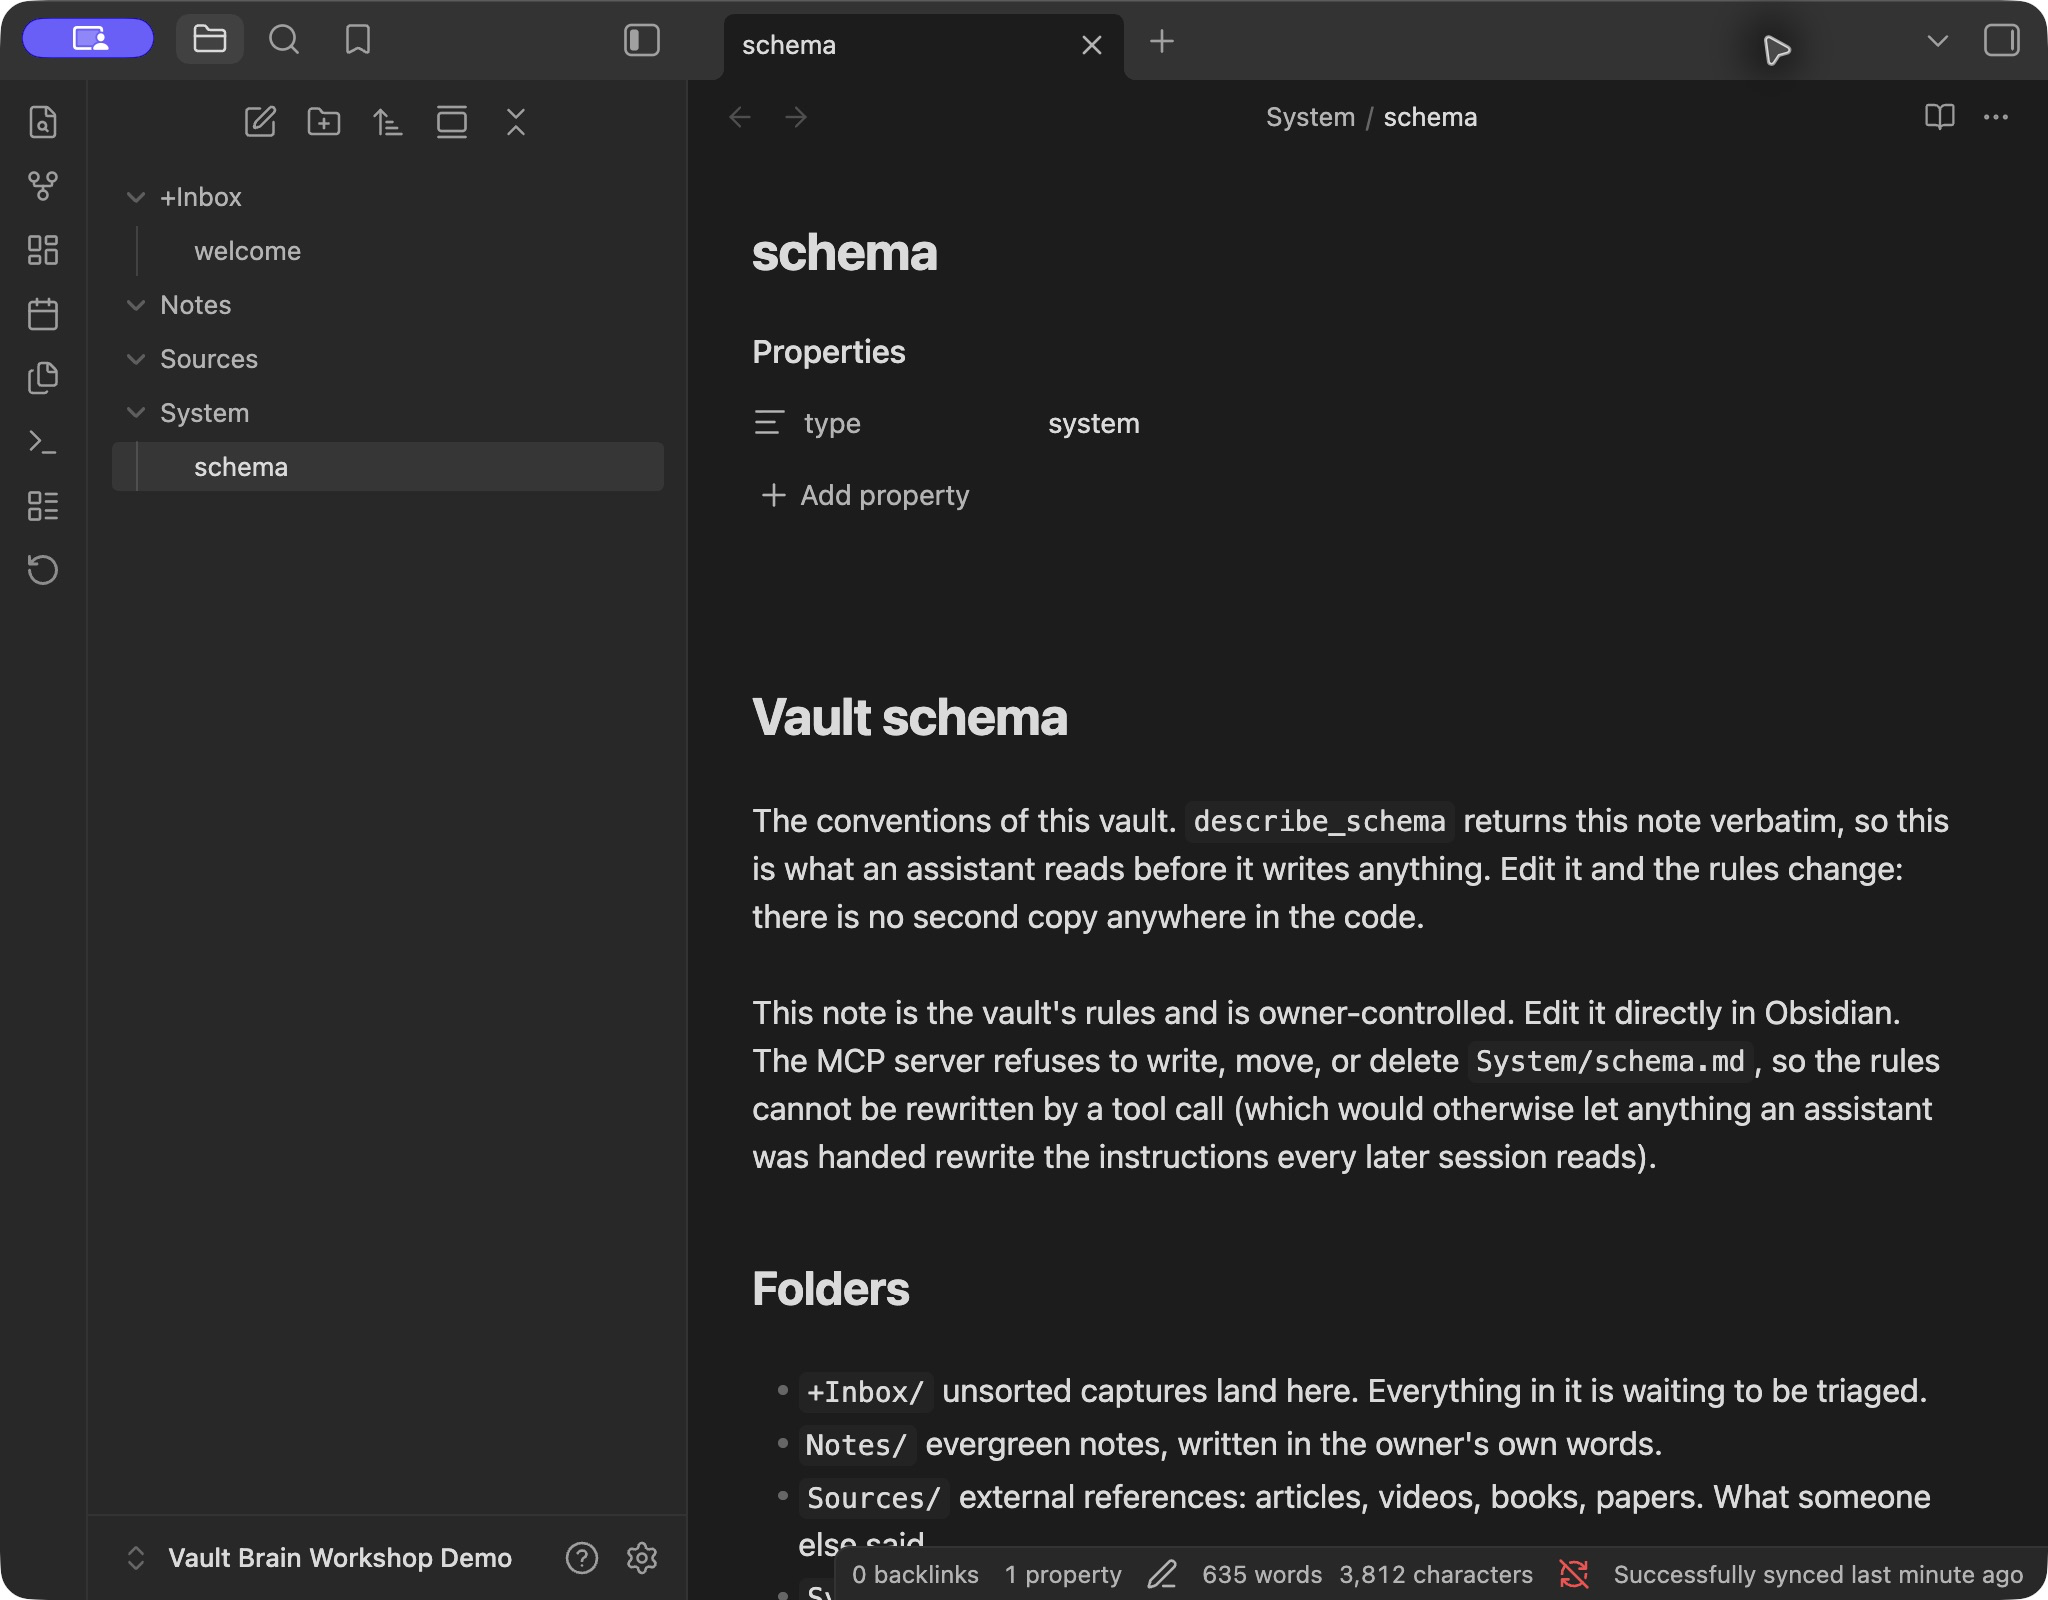
    After manual sync, expand +Inbox and System. Both starter notes appear, with the successful sync status at the bottom right.

    Real Obsidian demo vault after S3 sync, showing welcome and schema notes and a successful sync statusOpen full size
Protect the sync credentials

The IAM key can read, write, and delete vault objects. Never show it or the plugin's data.json in chats, screenshots, or recordings.

References: Remotely Save 0.5.25 settings source and the official project documentation.

Checkpoint

Both starter notes are visible in Obsidian. Complete the next activity to prove changes travel in both directions.

HANDS-ONSTEP 2

Prove the two-way sync

  1. 01In Obsidian, create +Inbox/obsidian-round-trip.md containing The vault remembers blue-orbit-47. Save and manually sync.
  2. 02Ask your AI client: “Find blue-orbit-47. Return its path and exact marker. Do not change anything.”
  3. 03Ask the AI client: “Capture a note titled AI to Obsidian check with the marker silver-comet-82. Tell me the saved path.”
  4. 04Manually sync again in Obsidian, open that path, and confirm silver-comet-82 appears.
Checkpoint

The AI finds your Obsidian note, and Obsidian shows the AI-created note. Both use the same S3 vault.

OPTIONAL REFERENCESync troubleshooting
REFERENCE

If Obsidian sync stops here

Bucket cannot be reached

Confirm that endpoint, region, bucket, and both credentials came from the same Terraform state. Keep Virtual Hosted-Style selected.

Starter notes do not appear

Confirm that Remote Prefix is empty. Trigger a manual sync and wait for its completion message before checking the file explorer.

AI cannot find the Obsidian note

Confirm it is a saved .md file outside .obsidian, run another manual sync, then search for the unique marker again.

Obsidian cannot see the AI note

Wait for the AI tool call to finish, trigger another manual sync, and refresh the file explorer. Do not enable automatic sync until this manual path works.

If a sync key is exposed

Rotate it with terraform -chdir=terraform apply -replace=aws_iam_access_key.sync, then replace the saved key on every connected device. Do not broaden the IAM policy to work around an AccessDenied error.

Keep it safe and keep going

AFTER

Take-home notes for security, recovery, and cost.

OPTIONAL REFERENCESafety and take-home notes
REFERENCE

Safety and recovery

  1. 01Treat the remote main/terraform.tfstate object as a secret. It contains the generated bootstrap password, static MCP bearer, and Obsidian sync credentials. A value marked sensitive is still present in state.
  2. 02Keep both buckets private. The state bucket holds infrastructure secrets; the vault bucket holds current Markdown and prior note versions.
  3. 03Remember that the state bucket is separate from the vault bucket. The MCP Lambda and Obsidian sync user must never receive state-bucket access.
  4. 04Treat ignored terraform.tfstate.*migration-backup* files as secrets. Move them to encrypted storage or delete them only after independently verifying the remote state.
  5. 05Use trash_note for normal cleanup. Use permanent deletion only for one exact disposable path.
  6. 06Use the vault bucket's S3 version history to recover an overwritten or deleted Markdown object within its configured 30-day noncurrent-version window. State-object versions are retained unless you deliberately add a lifecycle policy.
  7. 07Remember that notes returned through MCP are sent to the AI client you chose. Review that provider's data handling before storing sensitive material.
  8. 08Keep an independent encrypted backup. S3 version history helps with recovery, but it is not a complete backup strategy.
Operating rule

Keep credentials private, prefer recoverable actions, and name one exact path before any permanent deletion.

REFERENCE

Cost, backup, and careful teardown

This setup uses a small dedicated S3 state bucket plus the S3 vault, Lambda, API Gateway, Cognito, IAM, and CloudWatch Logs. Personal use may fit within account allowances, but it is not guaranteed to be free. Review current pricing for your region and monitor the account after deployment.

1 · copy the current vault to an encrypted local disk
terraform -chdir=terraform output -raw vault_bucket# Copy the bucket name
terraform -chdir=terraform output -raw aws_profile# Copy the AWS profile
terraform -chdir=terraform output -raw region# Copy the region
aws s3 sync s3://YOUR_VAULT_BUCKET vault-brain-backup --profile YOUR_AWS_PROFILE --region YOUR_REGION# Replace all three uppercase tokens before running
  1. 01Open vault-brain-backup in your file manager, verify several Markdown files, then move the folder into your normal encrypted backup system.
  2. 02In the S3 console, empty the exact Vault Brain bucket, including every object version and delete marker. A versioned nonempty bucket blocks Terraform teardown.
  3. 03Return to the matching repository checkout and confirm that npm run bootstrap-state reconnects it to the protected backend before reviewing the destroy plan.
  4. 04Keep the state bucket intact while Terraform destroys the application. The normal destroy does not target the backend bucket.
2 · destroy only after the verified backup
terraform -chdir=terraform plan -destroy -out=destroy.tfplan# Review the exact account and resources; the ignored plan can contain secretscareful
terraform -chdir=terraform apply destroy.tfplan# Apply only that reviewed plan, then delete the exact local plan filecareful
Finished safely when

The encrypted Markdown backup opens correctly, the exact versioned vault bucket is empty, Terraform reports a successful application destroy, and the protected state bucket retains the final remote state version.

Backend deletion is a separate advanced task

Backend deletion is intentionally outside this guide. Both the bootstrap and application state objects live in that bucket, and every protection resource has prevent_destroy. Retain it unless you have designed and verified a separate state migration and decommissioning runbook.

OPTIONAL HANDS-ON

Optional: capture this coding session now

GoalYour connected client has useful decisions from a coding session, and you want a durable summary without storing the raw transcript.

Ask: “Capture a note titled Session summary: Vault Brain setup. Include the goal, decisions and reasons, files touched, result, and open questions. Keep it concise. Omit secrets, tokens, credentials, raw command output, and the raw transcript. Tell me the saved path.”

  1. 01Read the proposed summary before approving any write if your client shows a confirmation.
  2. 02Open the returned path and check that it contains decisions rather than a transcript dump.
  3. 03Remove any private values that should not become durable context.
Checkpoint

The saved note is short, useful in a future session, and contains no credentials or raw transcript content.

Bonus: save a coding-session receipt

AFTER

Optional after the live workshop. Record that a Claude Code or Codex session happened, without saving its conversation.

OPTIONAL REFERENCEOptional coding-session hooks
REFERENCEBONUS

Add a session-receipt hook

The template repo has starter hooks for Claude Code and Codex. The first completed turn creates a small Markdown receipt in your local Obsidian vault's +Inbox/ for an approved project. Remotely Save can then sync it to S3. The receipt contains metadata only, not prompts, replies, or a transcript.

  1. 01Open the template's session-capture README and choose the Claude Code or Codex configuration. This bonus is not needed to finish the 90-minute workshop.
  2. 02Point the example at your local Obsidian vault and an approved personal-project folder. Review the command, then add it to the coding client's user-level settings. Projects outside that folder are skipped.
  3. 03Finish a disposable test turn inside the approved project. Open the new Markdown note, check that it is short and contains no credentials, then let Remotely Save sync it.
  4. 04For a decision summary, ask your connected MCP client to capture a separate note with the goal, decisions, changed files, result, and next step. The hook receipt is only a signpost that a session took place.
Privacy check

Only approve folders whose project names you are comfortable syncing. The hook does not save conversation content, and it never overwrites a receipt you edit in Obsidian.

What did you think?

Loading reactions…